
By Pascal LIBENZI.
Istio is certainly the most renowned service mesh. Its maturity has continued to grow since its creation in 2018 by IBM and Google. It was quickly appreciated and adopted by users for many reasons and has been given to the CNCF about a year after its creation.
Together, we will explore the various features offered by this service mesh and understand what it can bring us, quickly or in a long-term vision.
The installation can be done in many ways, using:
istioctl Command-Line Interface (CLI), which is a good way for proof of concepts for instanceistioctl)istioctl uses this operator, and is still a recommend way to install the service Mesh.The documentation gives us steps for various installation modes:
While there’s plenty installation instructions, we can find at the bottom of the installation page the dedicated page about why we should choose one rather than the other.
Let’s take the simple example while we setup a POC: we’re trying to do a lot in a short time to just ensure that everything works as expected, and be able to quickly demonstrate the offered features. So we chose to go with [istioctl] (https://istio.io/latest/docs/setup/install/istioctl/) and use it to implement our demo setup
For the binary we are redirected to the page getting-started which explains quickly how to install th service Mesh after downloading the CLI.
curl -L https://istio.io/downloadIstio | ISTIO_VERSION=1.18.2 TARGET_ARCH=x86_64 sh -
cd istio-1.18.2
export PATH=$PWD/bin:$PATH
While installing the CLI a message is shown:
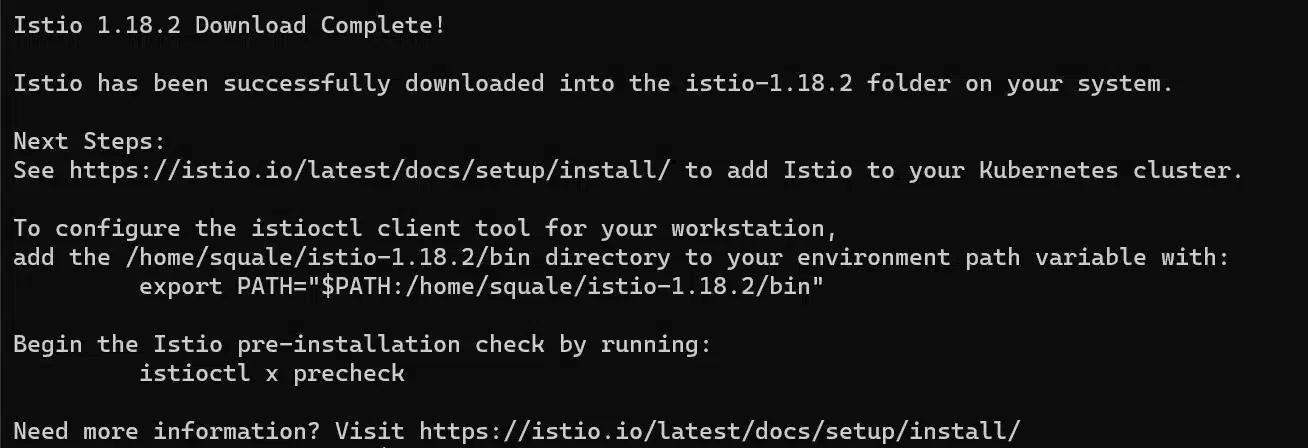
By launching the command istioctl x precheck, we can check that prerequisites for Istio are verfied

Since we want to demonstrate something, we will install it with the demonstration profile, meaning that every core feature is enabled:
istioctl install --set profile=demo
Notice that the documentation explains how the profiles work and how to customize them.
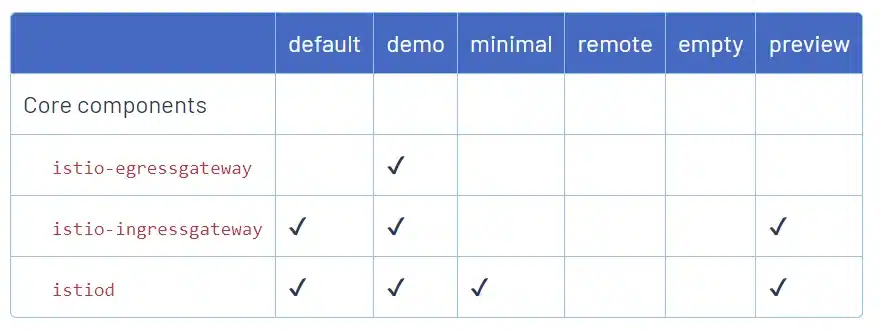
We can see that the Ambient profile (which is already aavailable) is not presented here because this new architecture is not mature yet and in alpha version.
Let’s get back to our installation, what have been setup? We continue to read the documentation and see that Istio created deployments in a dedicated namespace: istio-system

We can also check the configured components by reading the operator manifest – installed by istioctl:
kubectl -n istio-system get IstioOperator installed-state -o yaml > installed-state.yamlWith this installation, it takes just 5 minutes to install Istio and its components (elapsed time includes the CLI download). But depending on our requirements, especially if we are no longer in the proof of concept phase, we will need to change our approach and choose an installation method more suitable for our needs, based on the customizations we want to apply to our Istio deployment.
Uninstall is really easy using the CLI:
istioctl uninstall --purgeTo test your installation and before proceeding further, you need an application decomposed into microservices, so that the installation of the service mesh makes sense. Istio provides a lot of examples, most of them based on a typical application: [BookInfo] (https://istio.io/latest/docs/examples/bookinfo/). This is a very simple application that allows you to view ratings and details about a list of books. The application consists of 4 microservices, each written in different languages.
Let’s install the application that will serve as our foundation to explore the various possibilities offered by Istio:
kubectl create ns bookinfo
kubectl apply -n  bookinfo -f https://raw.githubusercontent.com/istio/istio/release-1.18/samples/bookinfo/platform/kube/bookinfo.yaml
We can see that although we’re on a typical installation (with sidecar containers) we don’t see them for now:

We know why, but this is a good introduction about a use case for the istioctl CLI.
Let’s imagine that on a cluster, we discover that the service mesh isn’t managing a specific namespace, and we’re unsure why.
This is the perfect time to introduce you to a debugging tool provided by Istio within the client: istioctl analyze. This command is defined by namespace, so you need to execute it within the namespace you want to debug.

Obviously, we didn’t specify to Istio that this namespace should be managed within the service mesh.
So we need to apply some labels onto our namespace :
kubectl label namespace bookinfo istio-injection=enabledWe notice that :
istio-injection annotation, we must put --overwrite to the command to override the existing valueistio-injection: disabled.To do this at the installation step use the option default namespace: istioctl install --set MeshConfig.defaultNamespace=all
Since we didn’t installed Istio this way, we will remove all pods and let the deployment recreate them:
kubectl delete po -n bookinfo --allNow our sidecar containers are started:

The documentation is divided into numerous chapters and sub-chapters, making it relatively easy to find the desired information.
The main chapters include:
Enabling mTLS is very straightforward, and the documentation provides you with all the options, including the possibility that you might need to be permissive for a while, to handle a migration for an application that might not support adding a sidecar proxy, for example.
Everything is based on the following manifest:
apiVersion: security.istio.io/v1beta1
kind: PeerAuthentication
metadata:
  name: default
spec:
  mtls:
    mode: STRICT
The mode can be PERMISSIVE or STRICT. Note that PERMISSIVE is the default value during Istio installation in general, unless you specify STRICT. This means allowing communication even if PeerAuthentication is not enforced (i.e., one of the pods doesn’t have an Istio proxy).
Various applications of this manifest are possible:
How can we observe what’s happening within our cluster?
Istio relies primarily on Kiali,, which allows you to visually see the interactions between services in your cluster and potentially identify any missing components or connections.
Install it:
kubectl apply -f https://raw.githubusercontent.com/istio/istio/release-1.18/samples/addons/kiali.yamlNotice that we have to install Prometheus too (Kiali is sourcing from it):
kubectl apply -f https://raw.githubusercontent.com/istio/istio/release-1.18/samples/addons/prometheus.yamlWe try to stay as simple as we can in this post, so let’s just do a port-forward of Kiali‘s services
kubectl port-forward -n istio-system svc/kiali 20001:20001Then we go to http://localhost:20001
On the overview page, we can see existing namespaces, and in the contextual menu, we can decide to enable or disable automatic injection of sidecar containers.
We can also notice in the
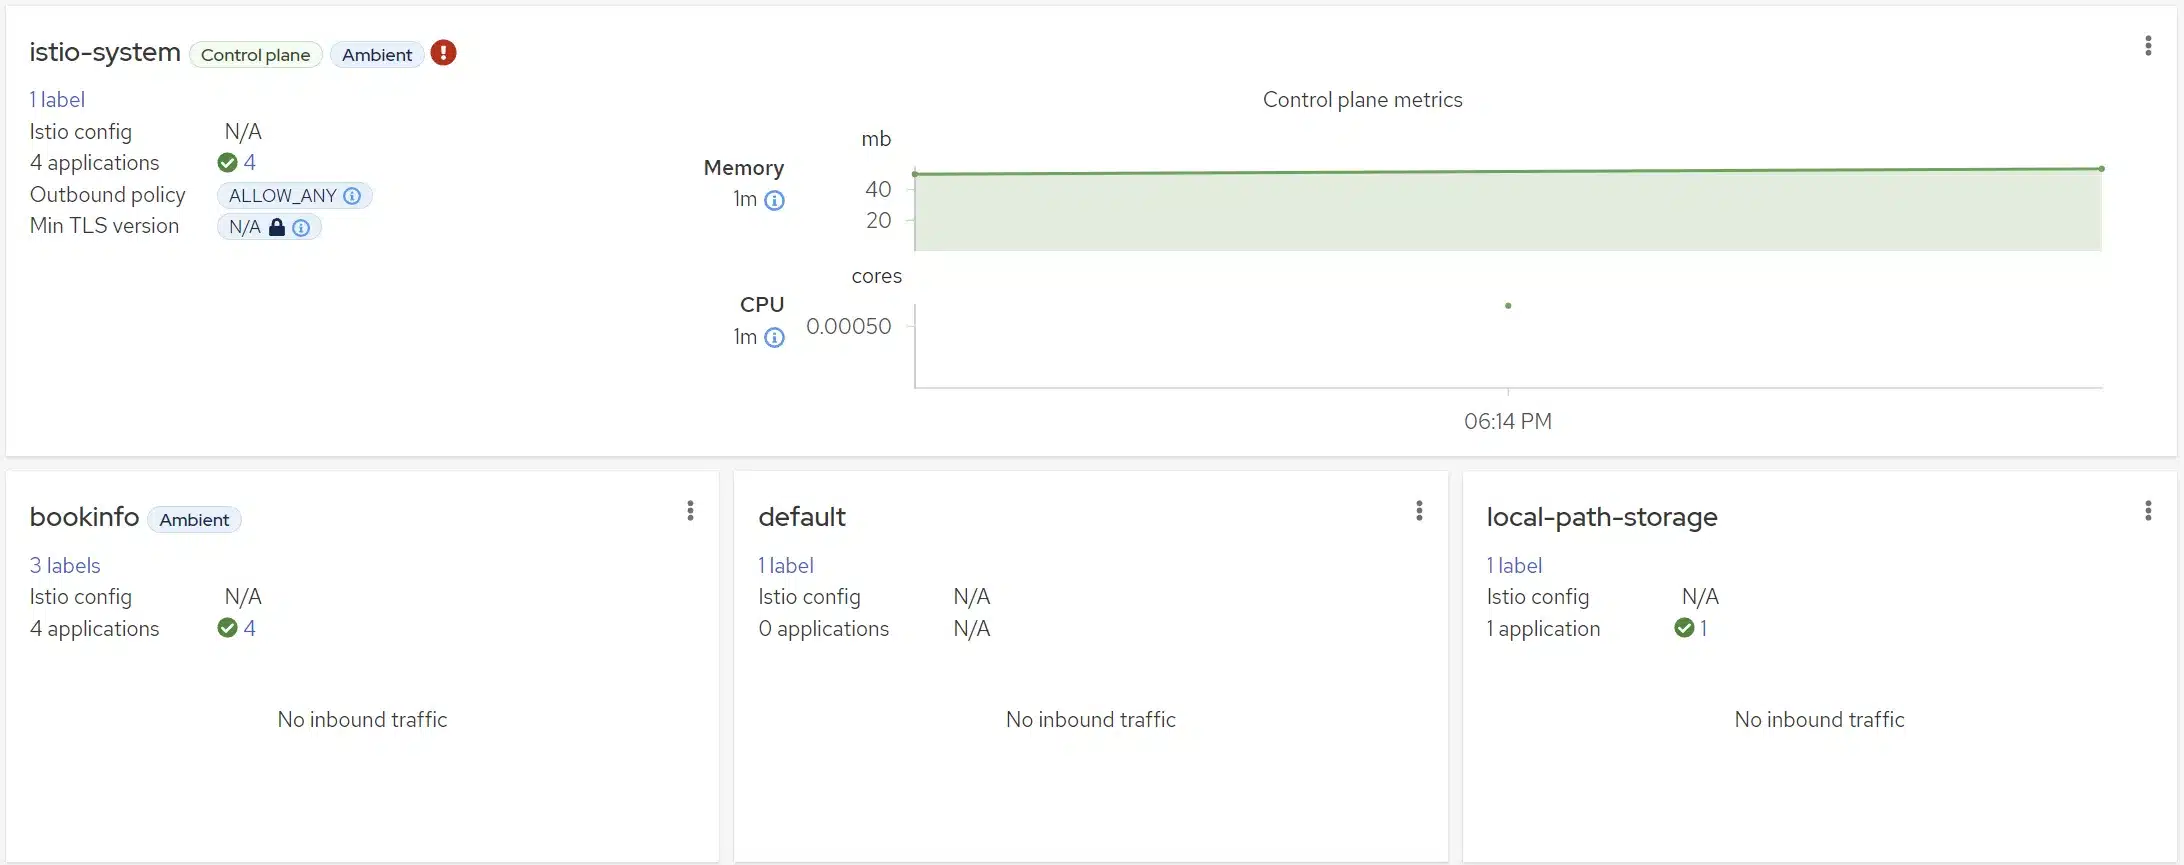
In the largest box at the top, within the istio-system namespace, you can also observe several pieces of information at a glance:
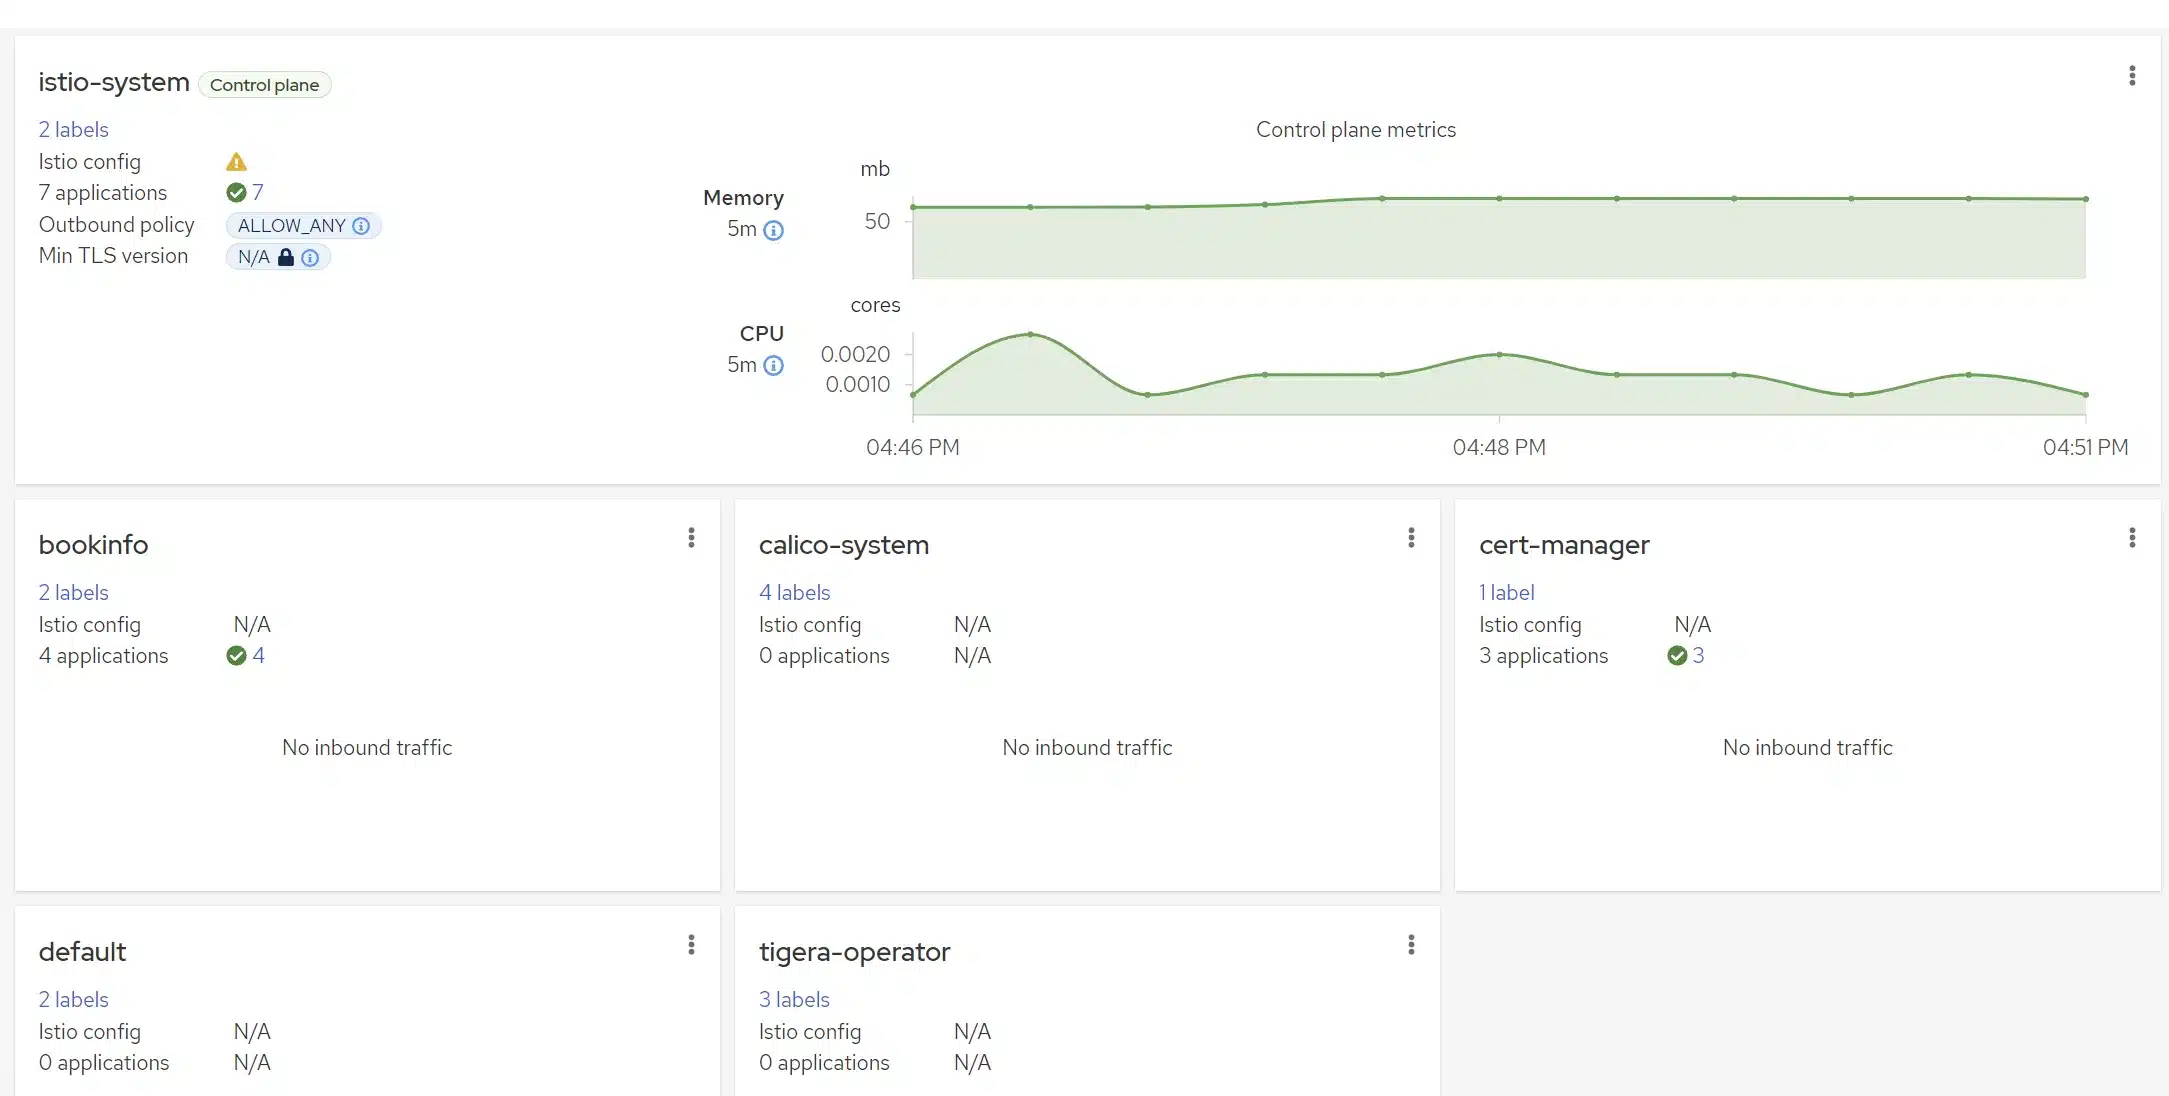
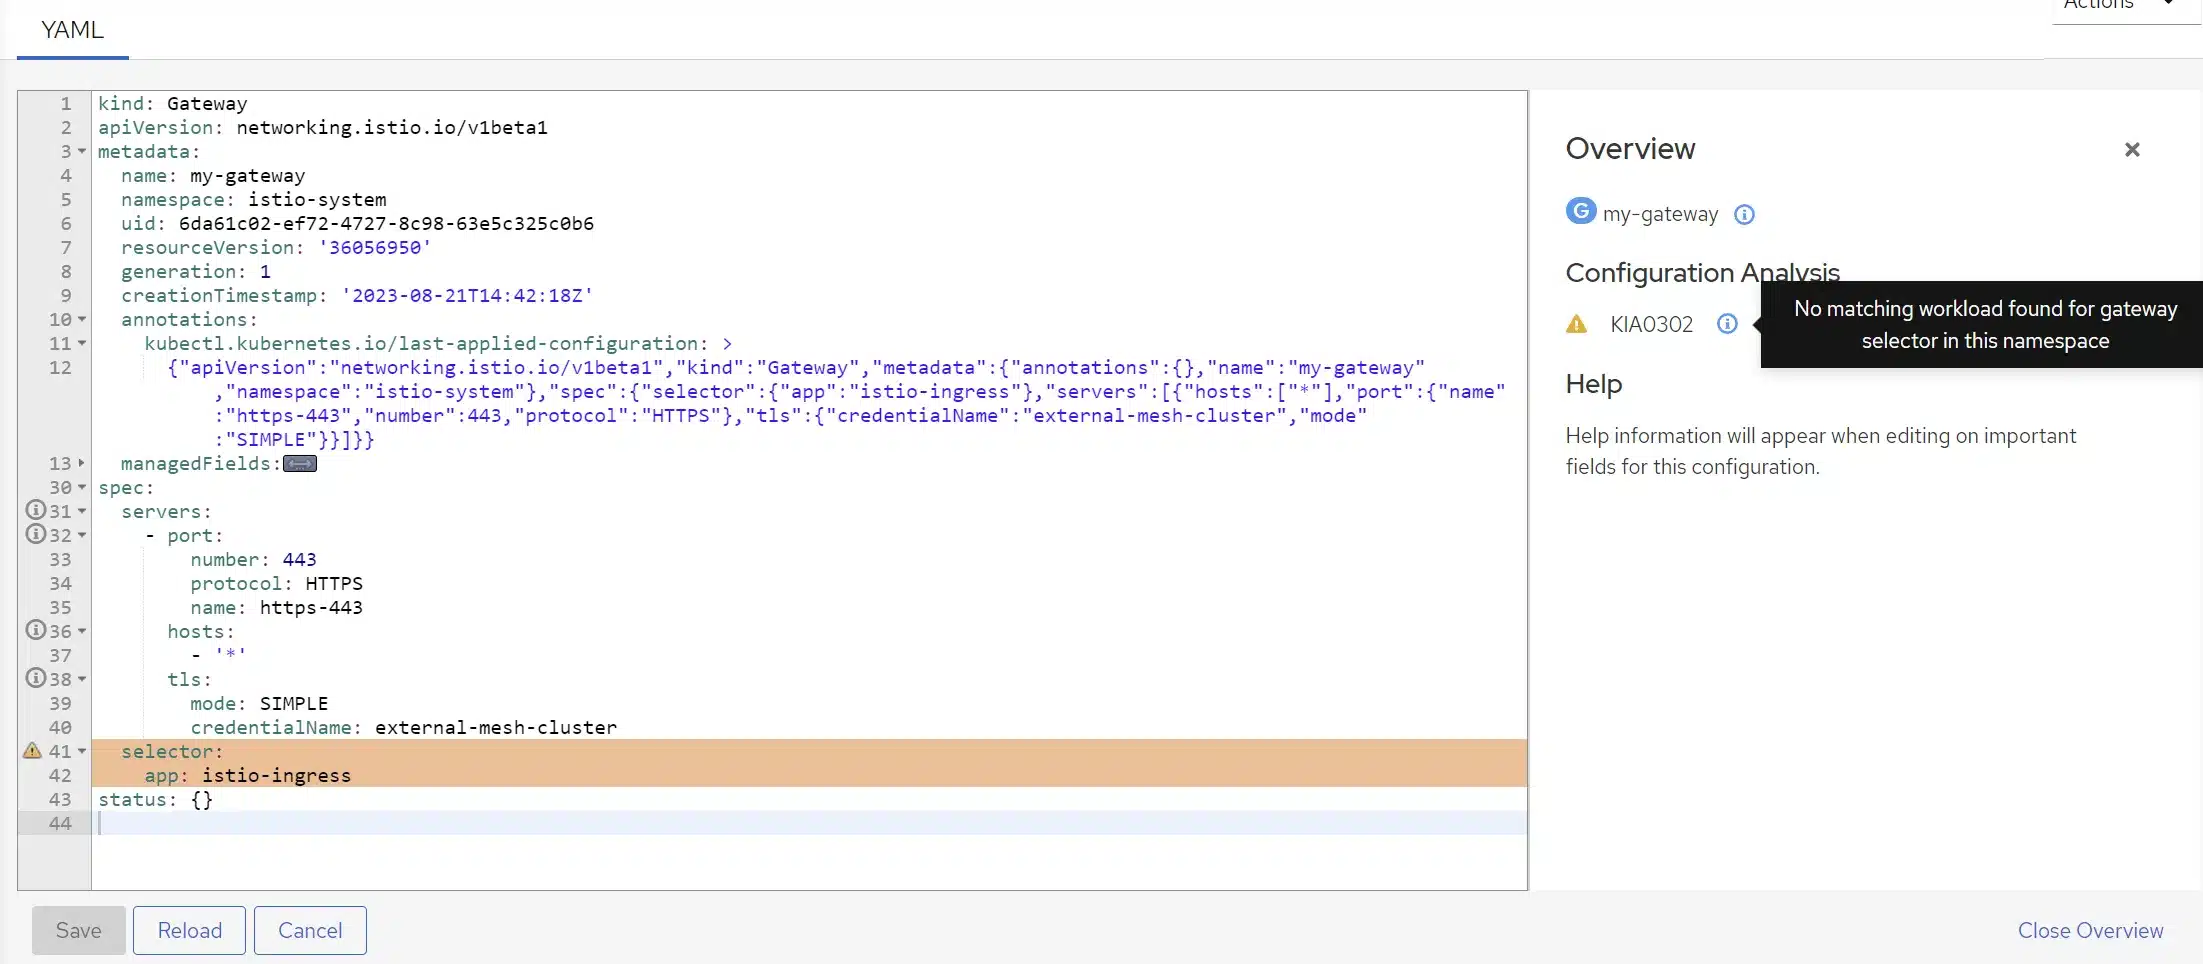
The Istio configuration, especially specific Istio objects, is presented here. If there is a misconfiguration, you’ll find warnings or errors. In this case, we generated a gateway that doesn’t target anything, and that’s why we see a warning.
By clicking on this icon, we are directed to the list of warnings and errors related to these objects, where we can view the details.

We can also switch between different pages in Kiali for a specific namespace (a shortcut equivalent to going to the page and then selecting the targeted namespace at the top left).
If we navigate to the Applications, Graph, Workloads, or Services sections, we currently don’t have any data for our bookinfo namespace. This is entirely normal because we haven’t generated any traffic in the application yet. To generate traffic, we will use a pod that will query product-page (which is the frontend of the application):
kubectl create ns curling
kubectl run mycurlpod -ti -n curling --image=curlimages/curl -- sh
max=100
for i in `seq 2 $max`
do
curl productpage.bookinfo.svc.cluster.local:9080/productpage?u=normal && sleep 0.1
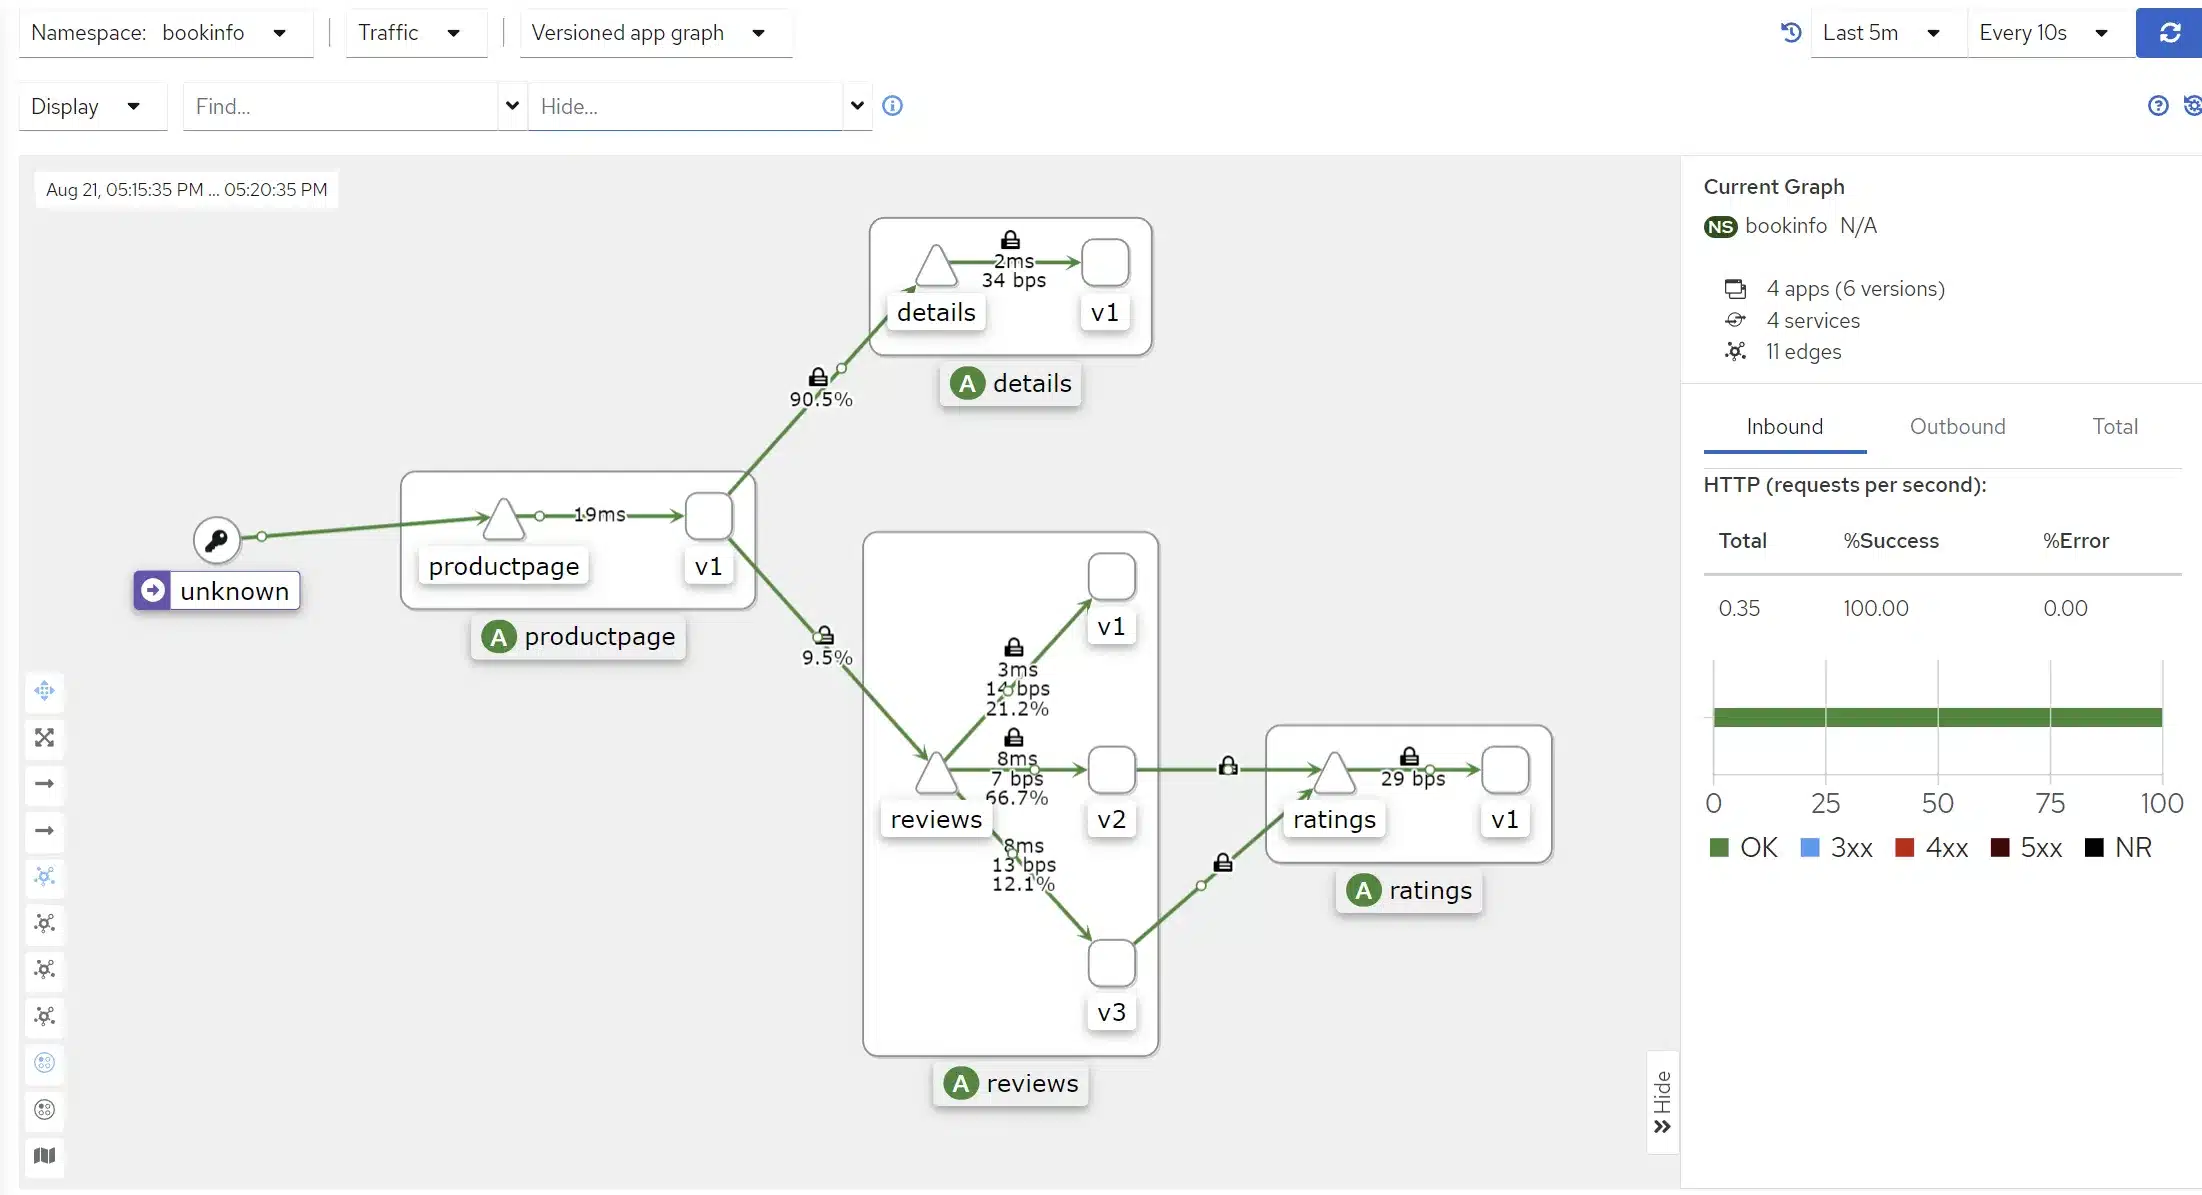
doneWe have generated traffic, so upon returning to Kiali, we now see more information:
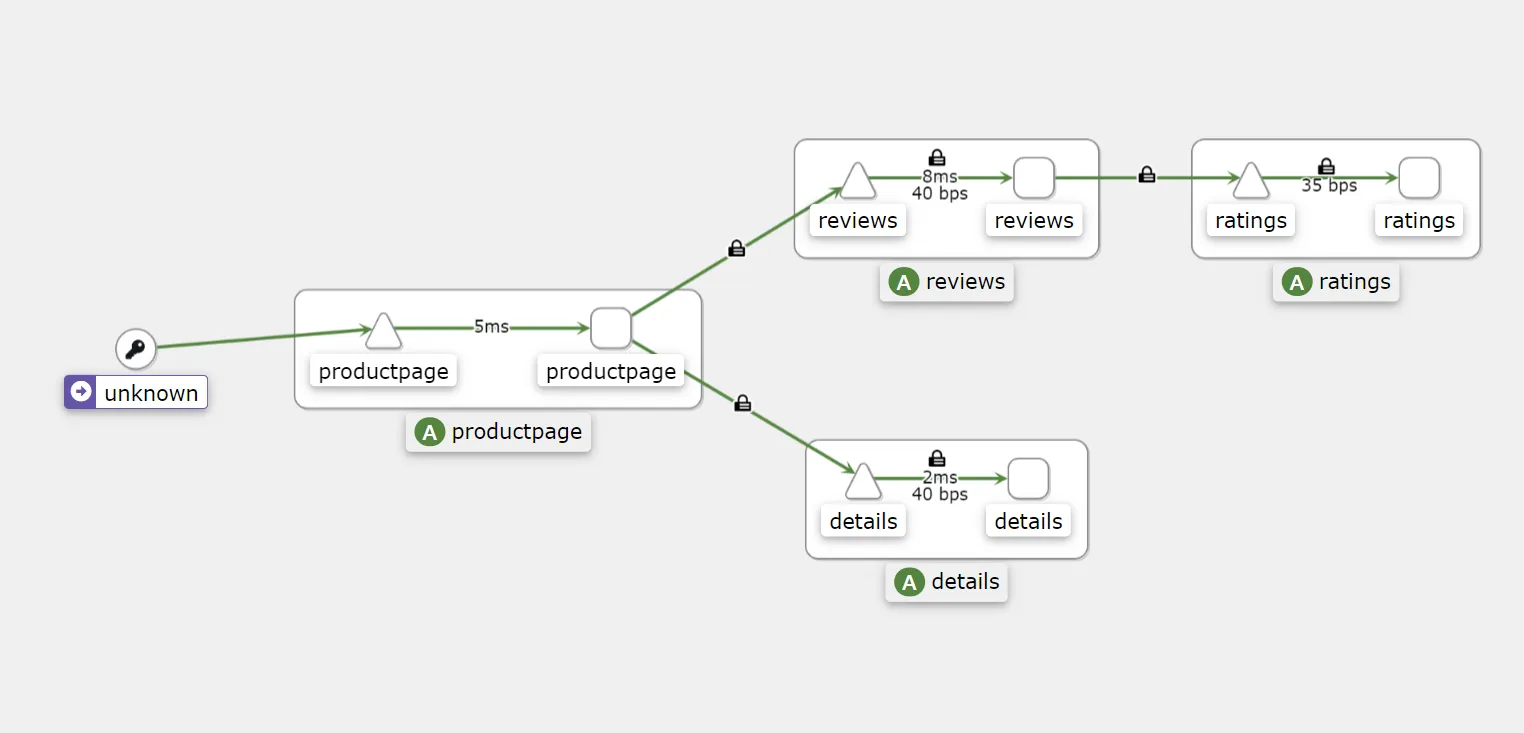
We have added some information through display customization (in the top left corner: Display):
You can go further and discover by yourself features proposed by Kiali. Its user-friendly interface and simplicity make it a tool that is naturally easy to grasp and understand as a whole.
Certainly, by clicking on a service in the graphical view, you likely discovered that Kiali provides you with HTTP error codes, indicating the percentage of successful and failed requests as well.
In conclusion, Kiali is definitely your best friend if you choose to go with Istio for you plateformm.
The Ingress gateway provided by Istio is responsible for distributing traffic to the appropriate services and is based on the Envoy proxy. This can be combined with the use of VirtualService to leverage the full power of the tools provided by Istio.
The Ingress gateway allows users, particularly those outside the system, to access services, effectively replacing a more traditional ingress controller. It can also be used to enforce security policies on incoming traffic.
Implemented as a Kubernetes deployment, the Ingress gateway is easy to deploy and manage.
Here are some of its features:
Therefore, the Ingress gateway can be used to enhance the security, performance, and reliability of our microservices from the perspective of users consuming our services.
VirtualService : These allow you to define how traffic is routed between microservices, enabling you to create rules around accessing your microservices, for example. For instance, you can implement a virtual service that directs traffic to the microservice only if a JWT token is provided.
Gateway: Gateways expose microservices outside the cluster and can also define how traffic is routed to microservices. You can implement a gateway that only allows specific origins (such as a specific CIDR) to access it, effectively blocking microservices associated with this gateway for any other origin.
DestinationRule: These define routing for a specific microservice. You can control access to microservices here as well. In this case, you could imagine returning a 403 error if the request source complies with our previous example of the gateway but attempts to access via HTTP instead of HTTPS.
ServiceEntry: These can help simulate an external service being part of our mesh resources (sidecar proxies consider the service as an “internal” service in a way), especially if we’re using the egress gateway provided by Istio. We can then create VirtualServices and specific rules around a service when one of the internal services wants to access a resource outside the cluster.
Istio provides various authentication features:
(Authorization policies) can be implemented to require users to be authenticated and authorized to access services.
It is also possible to define an external authorization provider. One can integrate oauth2-proxy with an instance of Keycloak, for example.
For securing a service, one could envision setting up a Keycloak microservice to provide JWT tokens, making them mandatory for accessing a service:
This approach can be very useful when migrating, for instance, the authentication model to JWT for all service accesses.
We won’t delve into the implementation details of the various deployment modes, to keep this blog post concise.
The standard deployment modes that can be implemented with Istio are:
Istio is recognized as the reference in the realm of service meshes. Initiated by Google, IBM, and Lyft, the project now has a huge community, accessible on platforms like Slack, and ready to address any questions we may have.
Evidence of Istio’s maturity lies primarily in the number of enterprises that have adopted it for production use. According to the CNCF Service Mesh Landscape 2023 report, Istio holds the top spot as the most widely used service mesh, with a market share of 57%.
Istio has already reached version 1.19.0, and with each version come features that may be promoted in subsequent versions, following the alpha, beta, stable cycle. Over time, each release has introduced a bunch of features and improvements across various Kubernetes versions and supported distributions.
Furthermore, some products, such as Gloo, are built on the top of Istio, underscoring the stability and confidence in Istio’s future.
Therefore, Istio should be seen as a highly mature and reliable service mesh. It is extensively employed by enterprises in production, and has a broad community of users and developers.
Istio introduced recently a new deployment mode that eliminates sidecar containers. You may have already heard about it: it’s called the Ambient version of Istio. To understand why we might want to remove sidecars in some use-cases, we invite you to read our previous article on service meshes, especially the section on “No-Sidecar Architecture”.
As mentioned earlier, Istio Ambient is still in its alpha version, and breaking changes can be expected in the near future. The core concept, however, is not likely to change. Currently, the supported Kubernetes distributions are quite limited, and integration with a standard CNI, such as Calico, can be painful as it is not yet fully documented.
While writing this article, we encountered several issues (on unsupported distributions), leading us to eventually test this installation on a KinD cluster on a Linux distribution, following the provided documentation.
This installation requires initially more resources than the traditional one, since the Istio CNI and zTunnels are deployed on the various nodes during installation. However, this is offset at runtime on clusters with a significant workload, as there are no longer sidecar containers.
To keep this article from becoming too lengthy, we continue here, in a demonstration context, using istioctl, and we do not detail all the steps found in the documentation, which you can explore on your own.
istioctl uninstall --purgeistioctl install --set profile=ambientWe immediately notice a difference in the installed components. This is expected since the architecture is different. Without sidecar proxies, we will need components capable of centralizing what the sidecar proxies used to handle.

If we look at the created pods into the istio-system namesapce, we can find out the components of the Ambient architecture:

Now let’s add our bookinfo namespace to our Ambient service Mesh:
kubectl label namespace bookinfo istio.io/dataplane-mode=ambientExecuting the command kubectl dashboard kiali we can quickly see changes into Kiali:
We will now quickly observe the main differences between a L4 and a L7 AuthorizationPolicy.
Creation of a L4 AuthorizationPolicy:
kubectl apply -f - <<EOF
apiVersion: security.istio.io/v1beta1
kind: AuthorizationPolicy
metadata:
 name: productpage-viewer
 namespace: default
spec:
 selector:
   matchLabels:
     app: productpage
 action: ALLOW
 rules:
 - from:
   - source:
       principals:
       - cluster.local/ns/default/sa/sleep
       - cluster.local/$GATEWAY_SERVICE_ACCOUNT
EOF
The three following commands will return successfully:
kubectl exec deploy/sleep -- curl -s "http://$GATEWAY_HOST/productpage" | grep -o "<title>.*</title>"
kubectl exec deploy/sleep -- curl -s http://productpage:9080/ | grep -o "<title>.*</title>"
kubectl exec deploy/notsleep -- curl -s "http://$GATEWAY_HOST/productpage" | grep -o "<title>.*</title>"
In the case of the last command, we pass through the gateway and so the callee service account is the gateway one, and not the notsleep pod’s service account; while the following command will be in error since we try to reach directly the service from our pod:
kubectl exec deploy/notsleep -- curl -s http://productpage:9080/ | grep -o "<title>.*</title>"The notsleep service account is not authorized because of our AuthorizationPolicy, that’s why the call is rejected. The produced error code curl (56) is a server-side error, at the transport layer, like a firewall blocking the ingress traffic for instance.
Let’s check logs into istio-system namespace:

We can see it is the zTunnel that rejected the request.
Now we will create a L7 AuthorizationPolicy, we will need a waypoint associated to it:
istioctl x waypoint apply --service-account bookinfo-productpage

kubectl apply -f - <<EOF
apiVersion: security.istio.io/v1beta1
kind: AuthorizationPolicy
metadata:
 name: productpage-viewer
 namespace: default
spec:
 selector:
   matchLabels:
     istio.io/gateway-name: bookinfo-productpage
 action: ALLOW
 rules:
 - from:
   - source:
       principals:
       - cluster.local/ns/default/sa/sleep
       - cluster.local/$GATEWAY_SERVICE_ACCOUNT
   to:
   - operation:
       methods: ["GET"]
EOF
When executing the following command :
kubectl exec deploy/sleep -- curl -s "http://$GATEWAY_HOST/productpage" -X DELETEThe error is a RBAC one, because the DELETE method is not authorized thanks to our L7 policy.
Let’s check logs into istio-system namespace:

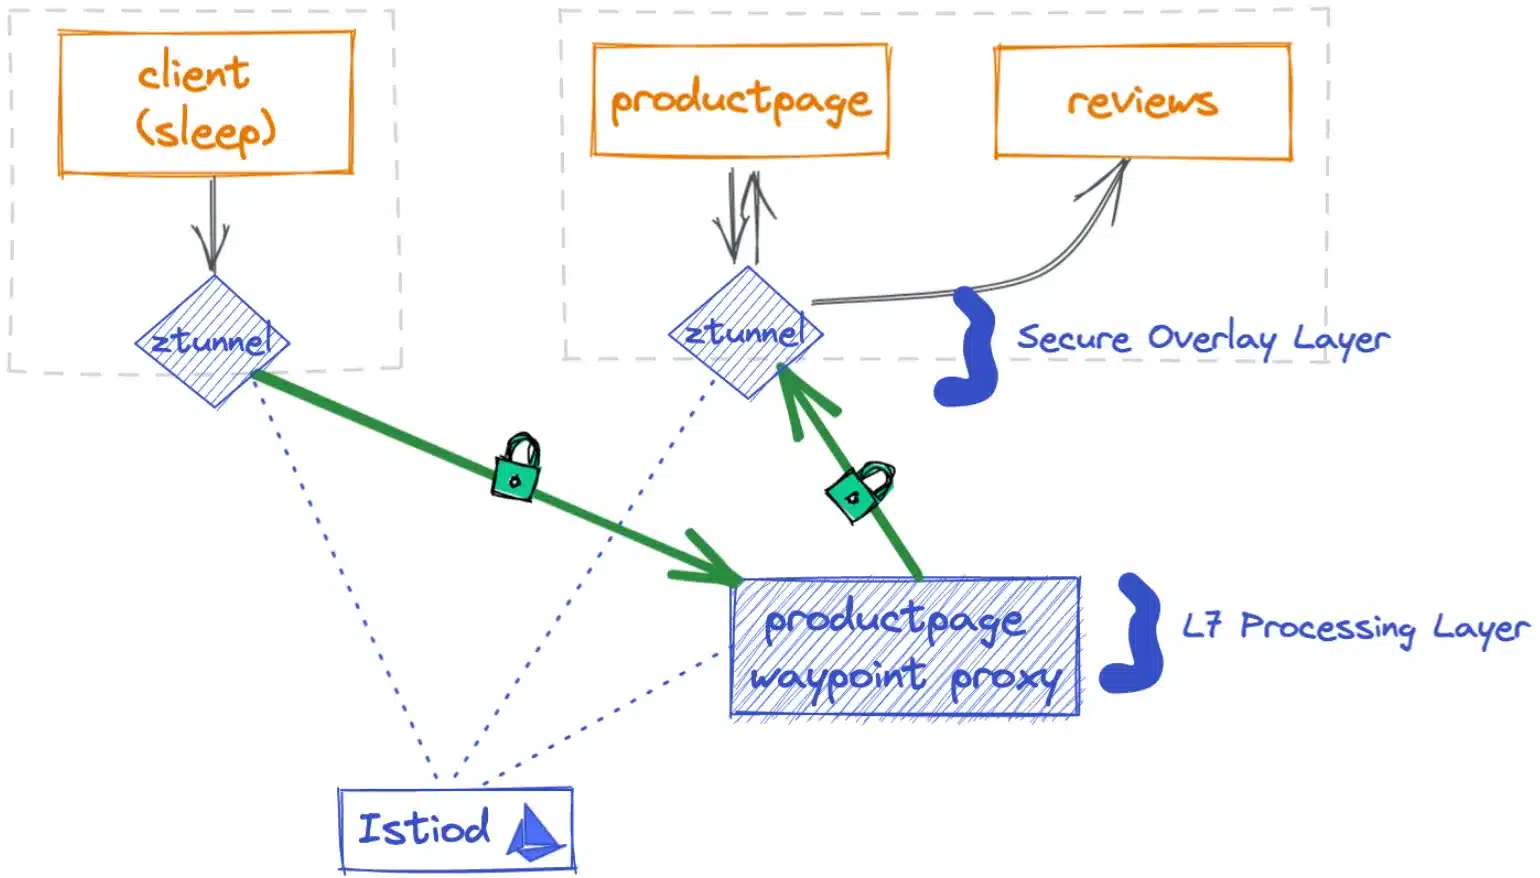
Why don’t we have many logs there? Actually, the waypoint activation has created a pod, and this is this pod that intercept the traffic at the applicative level to check authorizations:

And that is what is explained in this schema, from the Ambient mode documentation:
Due to its inherent nature, a service mesh can be a concern regarding the operability of our platform. Istio offers a wide range of features, and the learning curve can be challenging, maybe more with Istio than with other service meshes that provide fewer features.
However, Istio, particularly through its istioctl CLI, offers numerous debugging features.
When implementing Istio, consider:
The istioctl CLI is the main tool for debugging and visualizing configuration of your mesh cluster. Often, when something isn’t working, it’s due to a misconfiguration that needs to be fixed. This tool enables you to save time, especially by providing different visualizations of the service mesh configurations.
istioctl -- help provides you a tools list, and some of them are useful for debugging.
We will not expand the list into this post since the helper is enough documented to guide you through each command of the CLI
Further information on how to debug your service Mesh is available at the diagnostic tools documentation.
When you encounter issues, the first thing to do is to read and analyze the Istio loggging.
Be able to tail logs on all pods into a namespace can be useful when you’re debugging. We are used to put logs into some logging platforms, but when we are live debugging an issue, the stern can be a better way.
When we want to read all logs from the istio-system namespace, we use the following command to detect warnings and errors:
stern -n istio-system .*We can also log more granularely when we use the analyze feature from istioctl.
As we’ve seen, the Prometheus/Kiali tooling is one of your best assets for observing in real-time what is happening in your cluster.
Note that there are numerous integrations between Istio and well-known observability tools (Prometheus, Grafana, Kiali, Jaeger, Zipkin, …). Each of these integrations can allow you to delve deeper into visualizing your service mesh and its health. Therefore, don’t hesitate to explore the official documentation for the integration between Istio and your preferred tool.
This aspect will be covered in a dedicated article focusing on the implementation of a multi-cluster service mesh, as there are numerous architectural possibilities. Just be aware that support for multi-cluster implementation is well-present in Istio and, once again, is very well documented.
Istio is the leader in service meshes and offers a plethora of features to help manage various aspects in your Kubernetes cluster. We haven’t covered certain points here, such as error injections or circuit breakers, for the sake of brevity, but be aware that there are many topics you can explore around Istio.
It’s worth noting that this service mesh has matured significantly over time and provides comprehensive tools and documentation for the setup, maintenance, and configuration of your cluster. There’s not doubt that any issue encountered with this product can be resolved, and you will always found support within the Istio community.
If you’re considering implementing a service mesh, believe Istio is the right choice, and seek more information, feel free to contact SoKube. We’ll be delighted to provide concrete answers tailored to your use cases.