
By Lionel Gurret.
In this article, we will delve into the intricate process of provisioning an Azure infrastructure to facilitate the backup of an Azure Kubernetes Service (AKS) cluster. While options like Azure Backup exist, they often fall short in terms of providing the automation capabilities required to orchestrate the creation of various essential resources through Terraform.
The backup and management of the AKS environment will lead us to explore in detail how to define our infrastructure using Terraform. We will dive into the intricacies of configuration and orchestration, providing an in-depth view of this crucial endeavor.
Next, we will take a pivotal step by deploying the Velero backup solution, harnessing the potential of Helm to simplify and optimize the process. We will highlight best practices and tips for a successful Velero implementation.
Throughout this article, we will address technical details, practical advice, and step-by-step instructions to equip you with the expertise needed to effectively manage your AKS infrastructure and ensure the protection of your data.
Stay with us for a deep dive into this captivating journey toward optimized backup and management of your AKS cluster on Azure.
Attention: Contrary to what is provided in the official VMware documentation for Velero, the solution does not allow the use of Workload Identities (refer to GitHub issue).

In our context, the AKS cluster and its resource group have already been provisioned. Refer to the official Terraform documentation for this part.
Here are the names of our resources to help you better understand the rest of this article:
resource "azurerm_resource_group" "rg" {
  ...
}
resource "azurerm_kubernetes_cluster" "k8s" {
  ...
}
Of course, in our repository, we have other Terraform files for declaring providers, variables, the backend, etc.
These Terraform manifests, along with the Azure DevOps provisioning pipeline for the infrastructure, will not be covered in this blog article.
To store our backups and snapshots, it is necessary to set up a storage account and a container.
You can choose to create it in the same resource group as the AKS cluster, or as explained in the documentation (see sources), use a dedicated resource group for backups.
Here’s the Terraform code used in our case:
resource "azurerm_storage_account" "storaccbackup" {
  name                     = "storaccbackup01"
  account_replication_type = "LRS"
  account_tier             = "Standard"
  location                 = azurerm_resource_group.rg.location
  resource_group_name      = azurerm_resource_group.rg.name
}

resource "azurerm_storage_container" "storcontbackup" {
  name                 = "velero"
  storage_account_name = azurerm_storage_account.storaccbackup.name
}
You can add the access_tier parameter and set it to "Cool" if your backups will not be frequently accessed.

To establish a connection between our AKS cluster and our storage account, we will rely on a service principal. As explained earlier, the use of Managed Identity is unfortunately not yet available.
Here’s an example of code for creating this service principal and its associated resources:
data "azuread_client_config" "current" {}

resource "azuread_application" "this" {
  display_name = "aks-backup-${local.basename}"
  owners       = [data.azuread_client_config.current.object_id]
}

resource "azuread_service_principal" "this" {
  application_id = azuread_application.this.application_id
}

resource "azuread_service_principal_password" "this" {
  service_principal_id = azuread_service_principal.this.object_id
}This service principal needs access to the storage account, so we will add the Contributor role to it:
resource "azurerm_role_assignment" "contributor_velero" {
  principal_id         = azuread_service_principal.this.object_id
  scope                = azurerm_storage_account.storaccbackup.id
  role_definition_name = "Contributor"
}
It’s possible to define a custom role to limit the permissions granted to our service principal (see sources).
Certain parameters will need to be used by Helm when we install Velero on our AKS cluster. Therefore, it’s important to store the following information in an Azure Key Vault:
resource "azurerm_key_vault" "aks_kv" {
  ...
}

locals {
  keyvault_secrets = {
    aks-backup-resource-group-name = azurerm_storage_account.storaccbackup.resource_group_name
    aks-backup-storage-account-name = azurerm_storage_account.storaccbackup.name
    azure-tenant-id = data.azuread_client_config.current.tenant_id
    azure-backup-sp-client-id = azuread_application.this.application_id
    azure-backup-sp-client-secret = azuread_service_principal_password.this.value
  }
}

resource "azurerm_key_vault_secret" "keyvault_secrets" {
  for_each     = local.keyvault_secrets
  name         = each.key
  value        = each.value
  key_vault_id = azurerm_key_vault.aks_kv.id
}
These variables can be retrieved through an Azure DevOps variable group linked to our Azure Key Vault and used in our Helm pipelines.
The entire infrastructure has been defined; now we can provision it using the well-known Terraform commands:
terraform init
terraform plan
terraform apply
In another Azure DevOps repository, we will now prepare our deployment pipeline and Velero configuration files.
Firstly, we need to create a credentials-velero file containing the following information:
AZURE_SUBSCRIPTION_ID=XXXXXXXX-XXXX-XXXX-XXXX-XXXXXXXXXXXXX
AZURE_TENANT_ID=#{azure-tenant-id}#
AZURE_CLIENT_ID=#{azure-backup-sp-client-id}#
AZURE_CLIENT_SECRET=#{azure-backup-sp-client-secret}#
AZURE_RESOURCE_GROUP=MC_XXXXXXXXXXXXXXXXXXXXXXXXXXXXX
AZURE_CLOUD_NAME=AzurePublicCloud
Make sure to adapt the variable for the subscription ID and the Azure resource group. This is the auto-generated resource group created during the AKS cluster setup!
The variables between tags will be modified by our Azure DevOps pipeline. This allows us to avoid displaying sensitive data in our code.
We will also pass our various values to Helm before installing the Velero helm chart. For this, we create the velero-values.yaml file in our repository:
configuration:
  backupStorageLocation:
    - name: azure
      bucket: velero
      provider: azure
      config:
        resourceGroup: #{aks-backup-resource-group-name}#
        storageAccount: #{aks-backup-storage-account-name}#
  volumeSnapshotLocation:
    - name: azure
      provider: azure
      config:
        resourceGroup: #{aks-backup-resource-group-name}#
        storageAccount: #{aks-backup-storage-account-name}#

snapshotsEnabled: true
deployNodeAgent: true

image:
  repository: velero/velero
  pullPolicy: Always

initContainers:
  - name: velero-plugin-for-microsoft-azure
    image: velero/velero-plugin-for-microsoft-azure:master
    volumeMounts:
      - mountPath: /target
        name: plugins
You can refer to the following documentation for other configurations.
Here’s a part of the content of our Azure DevOps pipeline file that we’ll use to install Velero on our AKS cluster:
...
# We load our variable from our Azure Key Vault
variables:
  - group: vargroup-k8s-kv
...
          # We install Helm
          - task: HelmInstaller@0
            displayName: Install helm
            inputs:
              helmVersion: '3.12.2'
              installKubectl: true

          # We add the necessary helm repository for Velero
          - task: CmdLine@2
            displayName: Add helm repos
            inputs:
              script: |
                helm repo add vmware-tanzu https://vmware-tanzu.github.io/helm-charts
                helm repo update

          # We replace our variables from our "KeyVault vargroup"
          - task: replacetokens@5
            displayName: Replace tokens in Velero config files
            inputs:
              rootDirectory: './'
              targetFiles: '**/*'
              encoding: 'auto'
              tokenPattern: 'default'
              writeBOM: true
              actionOnMissing: 'warn'
              keepToken: true
              actionOnNoFiles: 'continue'
              enableTransforms: false
              enableRecursion: false
              useLegacyPattern: false
              enableTelemetry: true

          # We install Velero !
          - task: HelmDeploy@0
            displayName: Helm Velero
            inputs:
              connectionType: 'Kubernetes Service Connection'
              kubernetesServiceConnection: 'XXXXXXXXXXXXXXXXXX'
              namespace: 'velero'
              command: 'upgrade'
              chartType: 'Name'
              chartName: 'vmware-tanzu/velero'
              releaseName: 'velero'
              valueFile: 'velero-values.yaml'
              arguments: "--create-namespace --set-file credentials.secretContents.cloud=./credentials-velero"
Once the pipeline is launched and executed, we can verify if the storage space is properly connected to our AKS cluster:
$ kubectl get BackupStorageLocation -n velero
NAME    PHASE       LAST VALIDATED   AGE   DEFAULT
azure   Available   0s               26m
We have successfully installed Velero and its infrastructure!
To create our backups, we will need to use the Velero CLI.
Here’s how to install it (documentation):
wget https://github.com/vmware-tanzu/velero/releases/download/v1.11.1/velero-v1.11.1-linux-amd64.tar.gz
tar -xzvf velero-v1.11.1-linux-amd64.tar.gz
sudo chmod +x ~/velero-v1.11.1-linux-amd64/velero
sudo cp ~/velero-v1.11.1-linux-amd64/velero /usr/local/bin/
velero versionWith the backup in place, we need to validate its functionality. To do so, we will use a test application provided by Velero.
Let’s start by downloading and installing the application on our AKS server:
cd ~/velero-v1.11.1-linux-amd64/examples/nginx-app
kubectl apply -f base.yml
Let’s verify that the application has been successfully deployed:
$ kubectl -n nginx-example get all
NAME                                    READY   STATUS    RESTARTS   AGE
pod/nginx-deployment-747864f4b5-8cwv2   1/1     Running   0          22h
pod/nginx-deployment-747864f4b5-w8d48   1/1     Running   0          22h

NAME               TYPE           CLUSTER-IP    EXTERNAL-IP     PORT(S)        AGE
service/my-nginx   LoadBalancer   10.0.24.168   20.250.58.191   80:30605/TCP   22h

NAME                               READY   UP-TO-DATE   AVAILABLE   AGE
deployment.apps/nginx-deployment   2/2     2            2           22h

NAME                                          DESIRED   CURRENT   READY   AGE
replicaset.apps/nginx-deployment-747864f4b5 2 2 2 22hTo initiate our first backup, we execute the following command:
$ velero backup create test-backup --include-namespaces nginx-example --wait --storage-location azure
Backup request "test-backup" submitted successfully.
Waiting for backup to complete. You may safely press ctrl-c to stop waiting - your backup will continue in the background.
.....
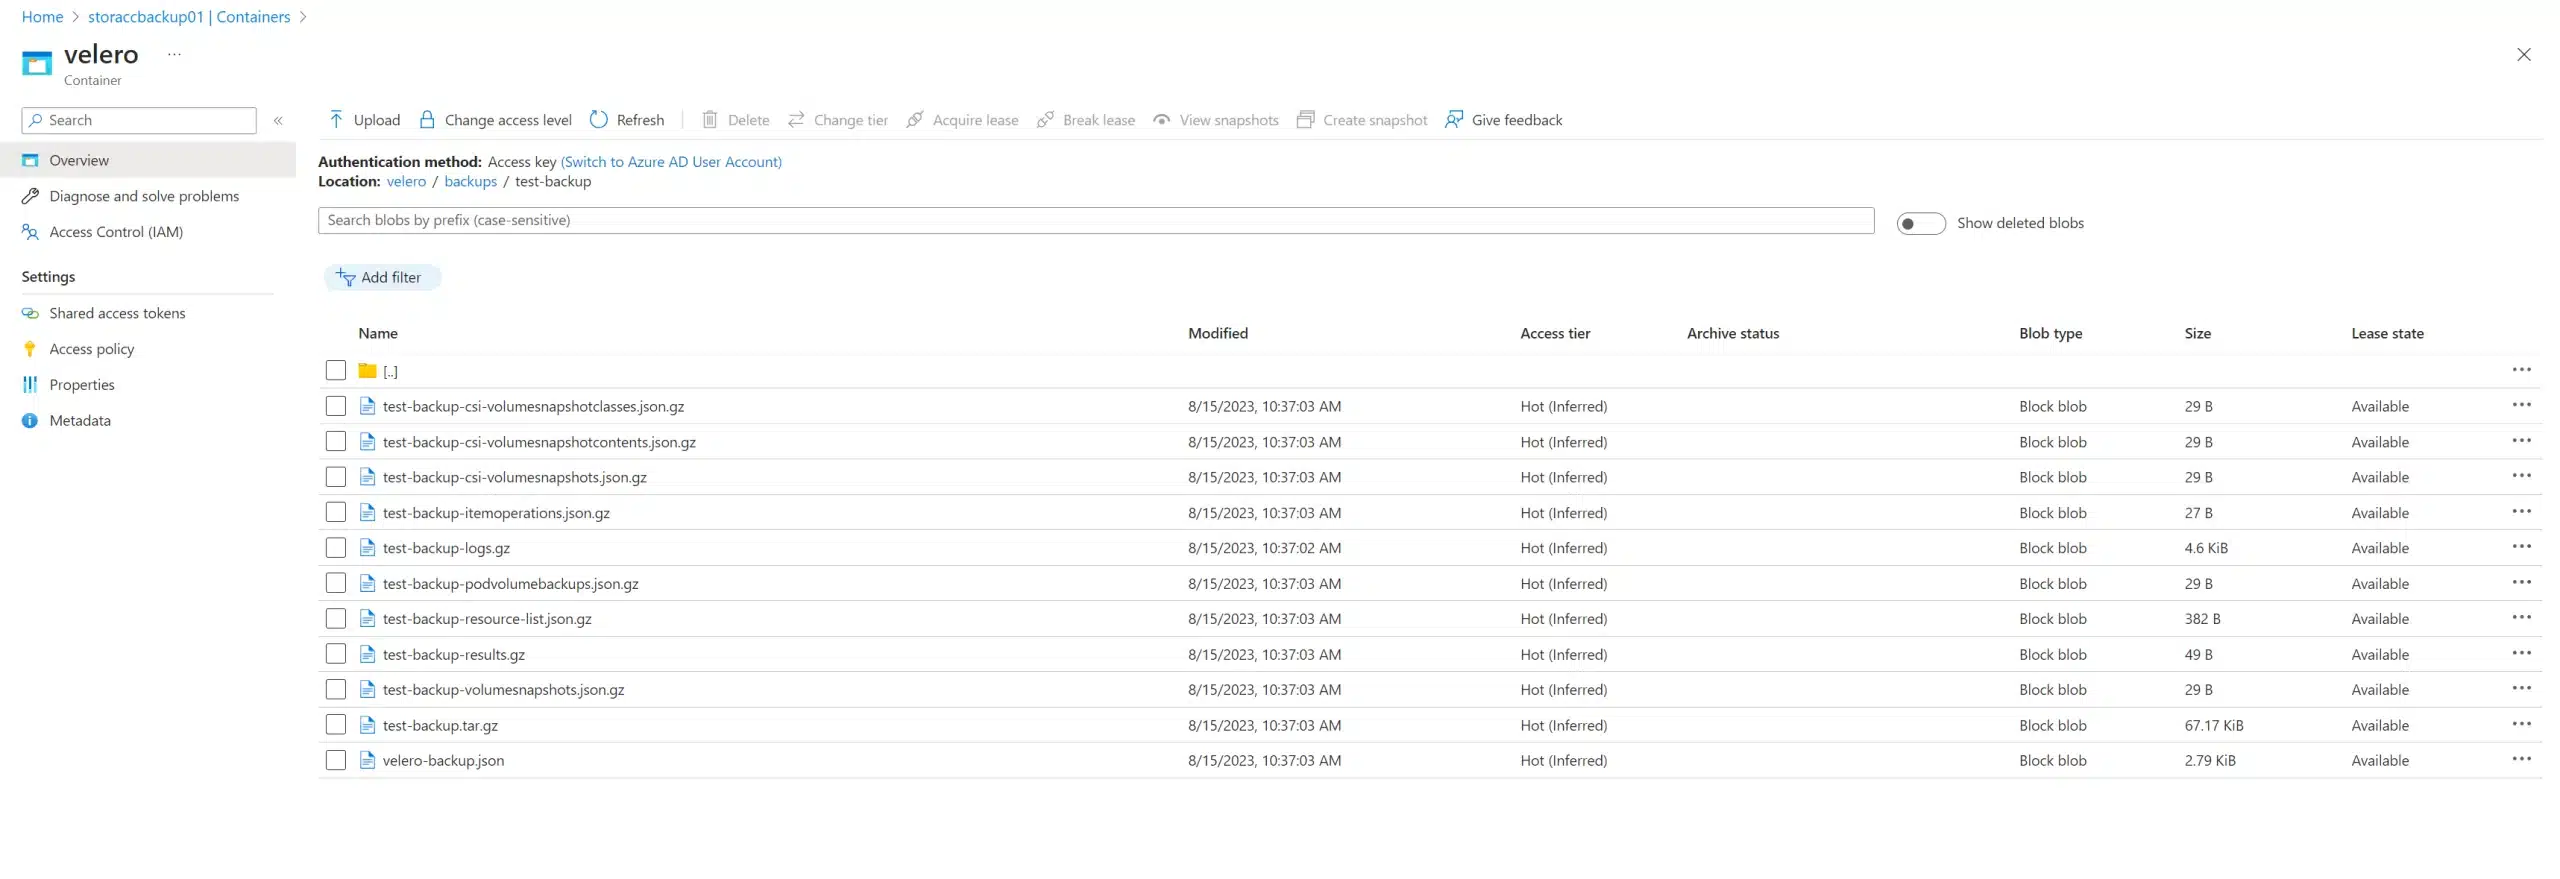
Backup completed with status: Completed. You may check for more information using the commands `velero backup describe test-backup` and `velero backup logs test-backup`.We can verify that the backup has been successfully executed and that files have been added to our storage container:
We can also view our backup on the server directly:
$ velero backup get
NAME          STATUS      ERRORS   WARNINGS   CREATED                         EXPIRES   STORAGE LOCATION   SELECTOR
test-backup Completed 0 0 2023-08-15 08:36:58 +0000 UTC 29d azure <none>We will start by deleting all resources in our nginx-example namespace to simulate a data loss:
$ kubectl -n nginx-example delete service my-nginx
service "my-nginx" deleted

$ kubectl -n nginx-example delete deployment nginx-deployment --force --grace-period=0
Warning: Immediate deletion does not wait for confirmation that the running resource has been terminated. The resource may continue to run on the cluster indefinitely.
deployment.apps "nginx-deployment" force deleted

$ kubectl -n nginx-example get all
No resources found in nginx-example namespace.
We can initiate the restoration:
$ velero restore create --from-backup test-backup
Restore request "test-backup-20230815084245" submitted successfully.
Run `velero restore describe test-backup-20230815084245` or `velero restore logs test-backup-20230815084245` for more details.
As indicated by the output message, we can track the restore process using the following command as instructed:
$ velero restore logs test-backup-20230815084245
time="2023-08-15T08:42:46Z" level=info msg="starting restore" logSource="pkg/controller/restore_controller.go:458" restore=velero/test-backup-20230815084245
time="2023-08-15T08:42:46Z" level=info msg="Starting restore of backup velero/test-backup" logSource="pkg/restore/restore.go:396" restore=velero/test-backup-20230815084245
time="2023-08-15T08:42:46Z" level=info msg="Resource 'customresourcedefinitions.apiextensions.k8s.io' will be restored at cluster scope" logSource="pkg/restore/restore.go:2030" restore=velero/test-backup-20230815084245
time="2023-08-15T08:42:46Z" level=info msg="Getting client for apiextensions.k8s.io/v1, Kind=CustomResourceDefinition" logSource="pkg/restore/restore.go:918" restore=velero/test-backup-20230815084245
time="2023-08-15T08:42:46Z" level=info msg="restore status includes excludes: <nil>" logSource="pkg/restore/restore.go:1189" restore=velero/test-backup-20230815084245
time="2023-08-15T08:42:46Z" level=info msg="Executing item action for customresourcedefinitions.apiextensions.k8s.io" logSource="pkg/restore/restore.go:1196" restore=velero/test-backup-20230815084245
...
Finally, we observe that our resources are available again:
$ kubectl -n nginx-example get all
NAME                                    READY   STATUS    RESTARTS   AGE
pod/nginx-deployment-747864f4b5-8cwv2   1/1     Running   0          15s
pod/nginx-deployment-747864f4b5-w8d48   1/1     Running   0          15s

NAME               TYPE           CLUSTER-IP     EXTERNAL-IP     PORT(S)        AGE
service/my-nginx   LoadBalancer   10.0.196.243   20.250.76.149   80:31188/TCP   15s

NAME                               READY   UP-TO-DATE   AVAILABLE   AGE
deployment.apps/nginx-deployment   2/2     2            2           15s

NAME                                          DESIRED   CURRENT   READY   AGE
replicaset.apps/nginx-deployment-747864f4b5   2         2         2       15s
Everything is now in place to automate the creation of backups!

/! Don’t follow the documentation related to Workload Identities (yet)
In conclusion, we have explored together how to implement Velero backups on Azure AKS using Infrastructure as Code (IaC). It’s important to note that while this method provides a robust backup solution for your AKS clusters, it may become outdated as both Terraform providers and Azure services continue to evolve and improve.
At SoKube, we understand the dynamic nature of cloud technologies and are committed to staying at the forefront of these advancements. Our team of experts is ready to assist you in navigating the ever-changing landscape of Azure and Terraform. Whether you need expert guidance, consulting, or training, we are here to leverage our expertise and empower you with the knowledge and tools to effectively manage your cloud infrastructure.
Don’t hesitate to reach out to us for all your Azure and Terraform needs. Together, we can ensure your infrastructure remains resilient, secure, and up-to-date in this ever-evolving digital era.