
By Lionel Gurret.
As you may already know, Kubernetes is a free and open-source container orchestration platform. It helps you manage containerized environments and provides amazing features such as self-healing, rollout, rollbacks, auto scaling and packaging !
Storage may not be your main concern if you are running stateless workloads or begin with Kubernetes but it will be one of the challenges you will have to face the day you run stateful applications on it.
Moreover, if you plan to configure cross datacenter clusters, backups, high availability, use different types of storage, encrypt data… You may look for a solution that fits your needs…
Before introducing Portworx, it’s important to do a quick review of the different types of storage we can rely on. Indeed, the first step is to define the type of storage you will use for your container workloads:
File storage : storage in file mode, like an NFS server. Lower performance. The only one to support the ReadWriteMany Access mode (explained in the next part of this blogpost.)
Block storage : storage in block mode, like a filesystem on a disk partition. The most efficient, but RWO only.
Object storage : S3 compatible object storage. On the other hand, it is up to the application deployed in the pod to "speak" the S3 protocol. Note that there is an emerging standard for kubernetes: the Container Object Storage Interface (COSI). which supports S3, Google Cloud Storage, Azure Blob, …
Here is a summary :
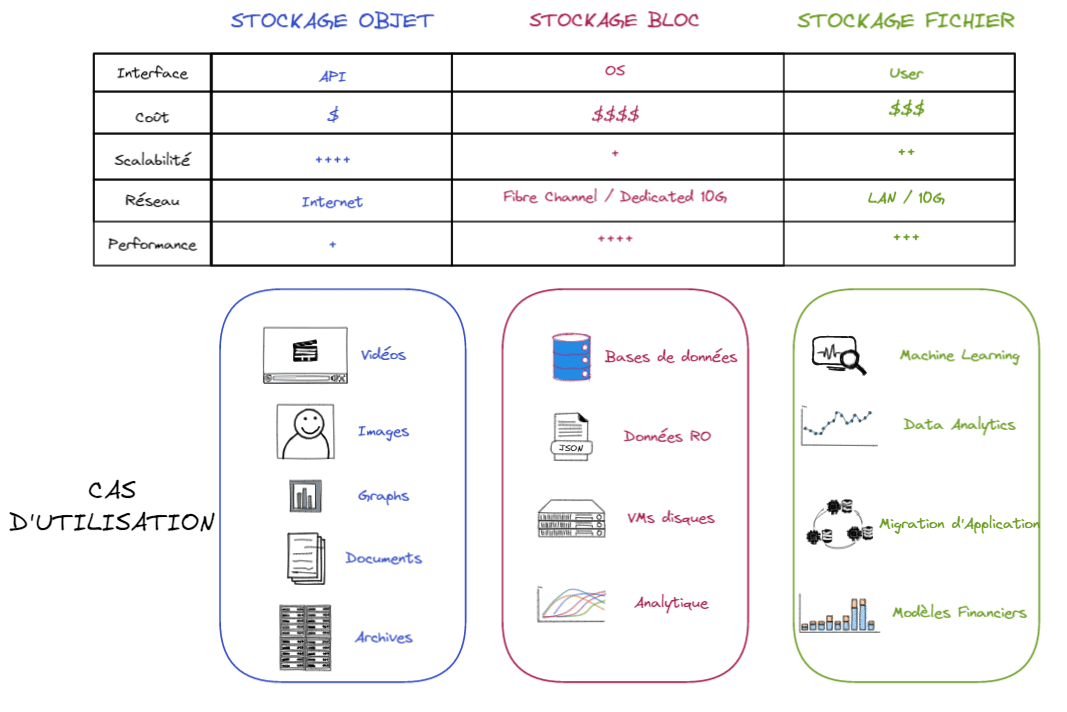
As you can see, all of them have pros and cons. As file system storage organizes data into a hierarchy of files and folder and block storage stores chunks of data in blocks, block storage may be more flexible than file system storage.
Thus, it makes it easier to adapt block storage for container environments. Finally, object storage could be a great option if massive scalability is a priority.
Portworx is a clustered block storage solution and provides a Cloud-Native layer from which containerized stateful applications programmatically consume block, file and object storage services directly through the Kubernetes scheduler.
With Kubernetes, a PersistentVolume (PV) can be mounted on a host in any way supported by the resource provider. Each PersistentVolume’s access mode is set to the specific mode supported by that particular volume.
The access modes are:
For instance, ReadWriteMany access mode could be used by applications like web servers (Nginx, WordPress, etc.) that can handle multiple instances writing to the same volume. However, it won’t be recommended to use for databases.
As we will see together, Portworx comes with many features and supports the ReadWriteOnce and ReadWriteMany access modes.
Nowadays, most organizations are hosting an increasing share of their applicative workload as containers. Orchestration tools like Kubernetes can host hundreds and thousands of these applications on large clusters.
These containers need access to storage which can be provisionned dynamically, on demand and as fast as possible. You may also need quotas, RBAC (Role Based Access Control) and encryption to secure the data.
In a HA setup, applicative workloads sometime require to be deployed across different regions. The problem with most of storage solutions (i.e EBS volumes on AWS) is that you can only attach it to a single node.
All these challenges can be supported by Portworx. This end-to-end storage and data management solution for all your Kubernetes projects has been recently acquired by PureStorage for an amount of 370 million dollars.

Portworx can be installed on premise or on public clouds such as GCP, AWS, Azure etc.
It is installed using containers and it’s easy to install and manage Portworx components through simple YAML files. You can install Portworx in an "hyperconverged" (PX storage and compute on same nodes) or "disaggregated" model (PX storage and compute on different nodes).
Like most of the distributed platforms, Portworx implements a control plane and a data plane.
_The control plane acts as the command and control center for all the storage nodes participating in the cluster (i.e provisionning and managing volumes)._
Each storage node runs a data plane responsible for managing the I/O and the attached storage devices __(__i.e what volume is mounted on what node).
Both the control plane and the data plane run in a distributed mode. This ensures the high availability of the storage service. To achieve the best uptime, Portworx recommends running at least three storage nodes in a cluster. Depending on the size of the cluster, each node may run the control plane as well as the data plane components. In large clusters, it is possible to have nodes that don’t participate in the data plane which means they are not designated as storage nodes.
Portworx operates typically within less than 3% overhead of the underlying storage hardware !
Finally, Portworx collects metrics from physical systems, virtual services, network, I/O requests, that can be collected using tools like Prometheus and displayed in dashboards using Grafana.
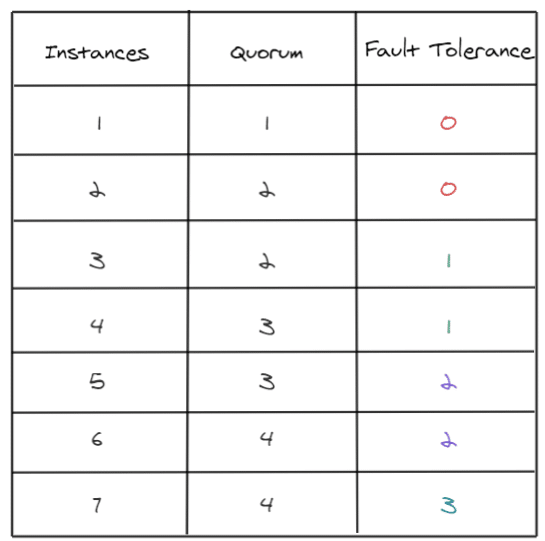
As discussed previously, Portworx recommends running at least three storage nodes in a cluster. In a Portworx cluster, all nodes are actives all the time. However a leader must be selected. Using the RAFT protocol, at a random time and using algorithms, a node will ask other nodes to be the leader. Once all other nodes agreed, each node will assume that this node is a leader.
In case, nodes don’t receive notifications from the leader for some time (network issue, leader down), nodes will initiate another electing process among themselves.
All information regarding the cluster are stored in an the RAFT database stored internally on each node.
Finally, just a quick reminder to calculate the Quorum, you can use the following formula :
quorum = abs (((number of nodes) / 2) + 1)
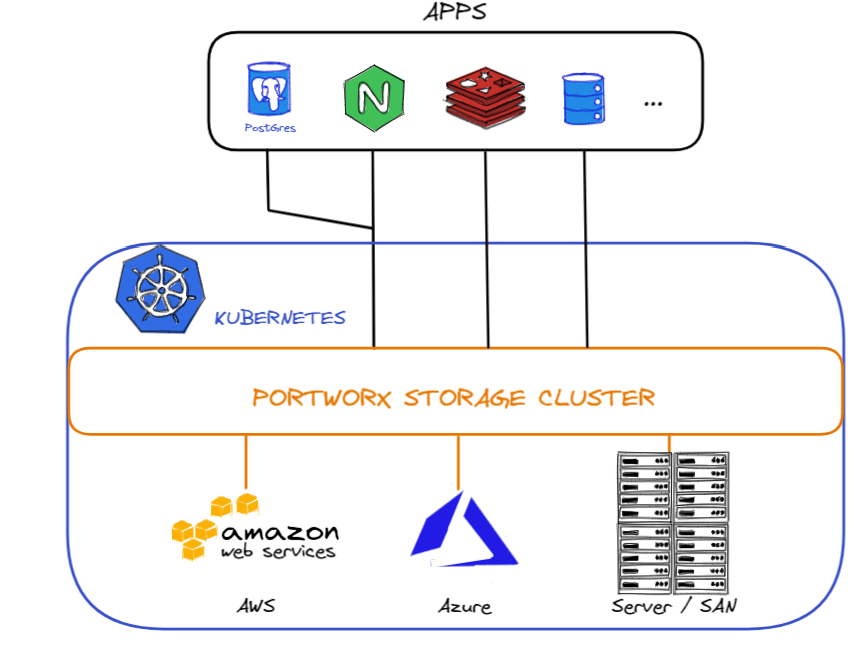
Portworx aggregates the storage of all kubernetes worker nodes in the cluster into a single large virtual pool of storage. It is able to organize storage by pool based on their IO usage and priority through StorageClasses as described below :
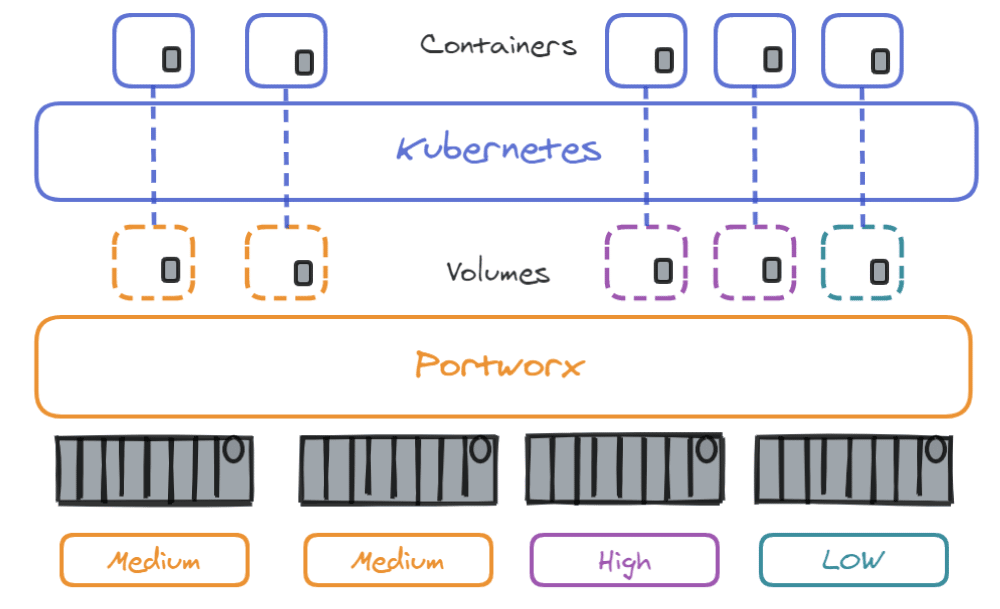
There is now a global pool of storage which can be used to create volumes used by our containers. One great advantage of Portworx is that even if the storage is located on a specific node, it allows you to use it on any node of the cluster. Even if nodes have no storage on them !
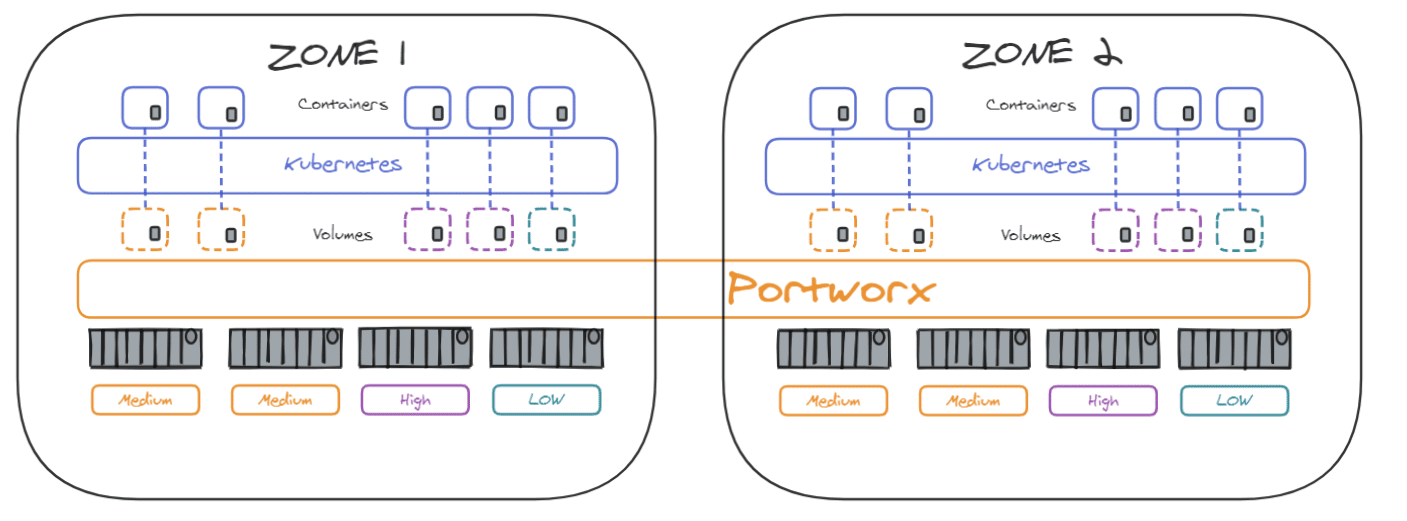
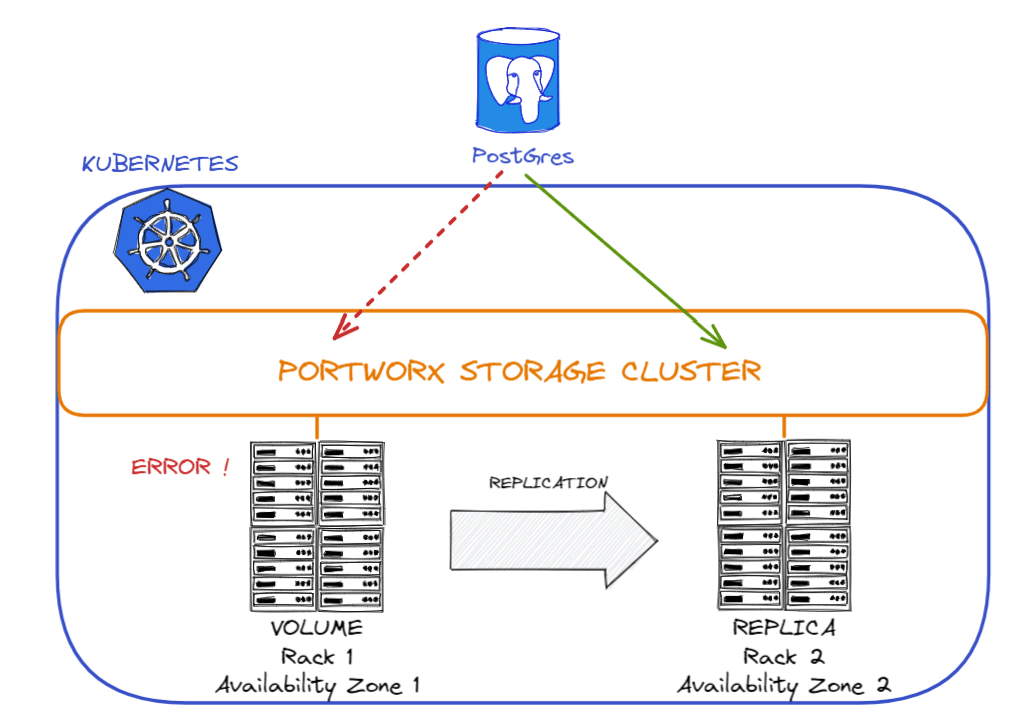
When applications are hosted accross data centers in multiple availability zones, Portworx cluster can also be expanded accross datacenters to ensure HA in case of a zone failure :
1 – Aggregation Sets : when you create a volume, it is attached by default to a single host. You may optionally have the volume stripped on different disks over different hosts. The storage can be seen as a single one through aggregation sets. It can be useful in terms of capacity and performance. As you can see on the following, this Kubernetes cluster relies on 3 different storage solutions (AWS, Azure and a SAN)
2 – Replication Sets : you can create volumes with replication sets, which will help you to have a copy of your volume. You can create 3 replicas per volume.
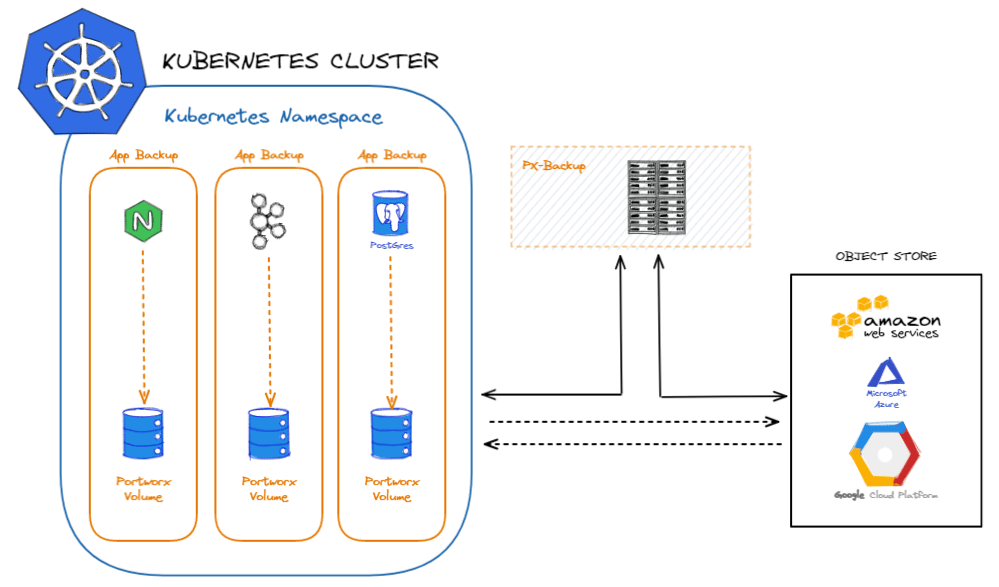
Thus, you can backup your Portworx volumes through AWS, GCP or Azure. If you face a disaster, the data from the backup can be restored into volumes before migrating the apps over. Portworx Backup manages the container data lifecycle, catalogs the relevant metadata, improves visibility of data access, and enables restoration of full Kubernetes applications including data, application configuration and Kubernetes resources with a single click.
Lighthouse is an easy, intuitive and graphical way to manage and monitor Portworx clusters. Lighthouse runs as a Docker container which makes it possible to run it on a laptop.
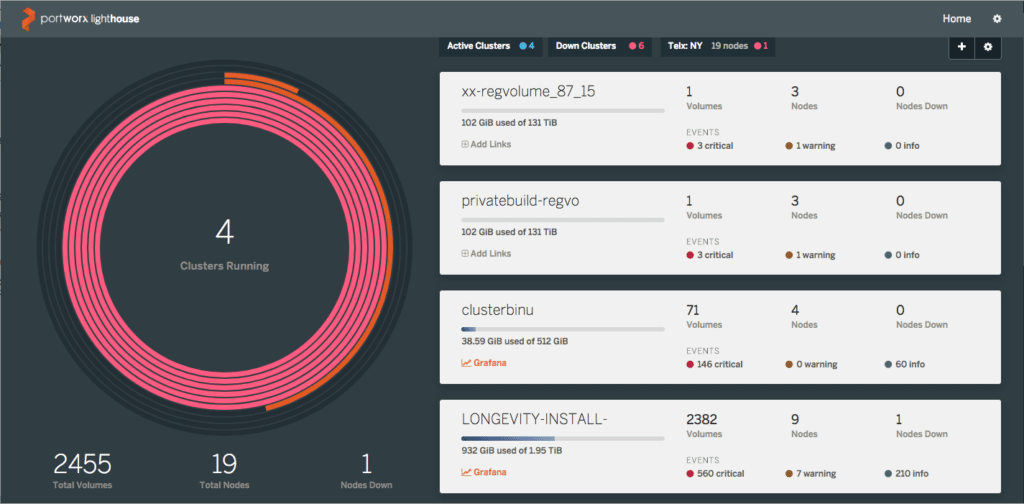
Adding/removing clusters in this view is straightforward. Simply click the add/manage icons on the top. The view can be configured to filter clusters based on ‘active’ or ‘down’ status, or by region. You can click any cluster then to drill down into nodes, volumes, snapshots, or containers running on that cluster.
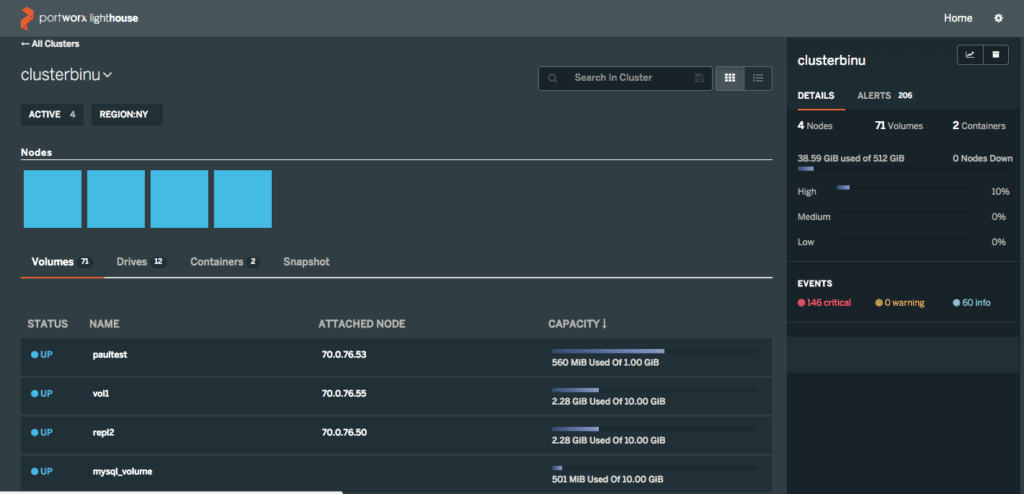
All the data on the cluster page above is searchable, making it easy to navigate to specific volumes or nodes.
Finally, Portworx has integration with Prometheus and Grafana for quite some time now and in the latest versions of Lighthouse, it is possible to have direct shortcuts to these services right from the dashboard. Adding the link is a one-off action from the cluster management page and gives a quick way to troubleshoot deeper with time-series data.
Here is the list of features provided by Lighthouse :
Once your volumes have been created (see cheatsheet), you need to attach your storage to containers.
To do this, you can use the following commands :
# Create storage a Docker volume
$ docker volume create --driver pxd --name px_vol --opt nodes="node1" --opt size=10

# Attach storage to a Docker container
$ docker run -v pwx_vol:/data nginx

# Both previous commands in a single one
$ docker run --volume-driver=pxd -v name=pwx_vol,nodes=node01,size=10:/data nginxCheck the official documentation here.
It’s pretty easy, you will have to run a simple kubectl apply with a configuration file and all resources such as namespace, daemonsets, cluster roles or services will be provisionned on the cluster. Other components will be deployed such as API Server, Stork or Lighthouse (discussed in the previous course)
To use Portworx on Kubernetes, you will have to be familiar with PersistentVolumes, PersistentVolumeClaims and StorageClass resources. You can find info directly on my website or on the official Kubernetes documentation.
Step 1: Create Storage Class.
Create the StorageClass you will use with your PVCs :
kubectl create -f examples/volumes/portworx/portworx-sc.yamlExample :
kind: StorageClass
apiVersion: storage.k8s.io/v1
metadata:
  name: portworx-sc
provisioner: kubernetes.io/portworx-volume
parameters:
  repl: "1"

Vérifiez que la StorageClass est créée :

kubectl describe storageclass portworx-sc
     Name:              portworx-sc
     IsDefaultClass:            No
     Annotations:       <none>
     Provisioner:       kubernetes.io/portworx-volume
     Parameters:        repl=1
     No events.
Step 2: Create Persistent Volume Claim.
Create the persistent volume claim :
kubectl create -f examples/volumes/portworx/portworx-volume-pvcsc.yamlExample :
kind: PersistentVolumeClaim
apiVersion: v1
metadata:
  name: pvcsc001
  annotations:
    volume.beta.kubernetes.io/storage-class: portworx-sc
spec:
  accessModes:
    - ReadWriteOnce
  resources:
    requests:
      storage: 2Gi
Check the PersistentVolumeClaim is created :
kubectl describe pvc pvcsc001
Name:           pvcsc001
Namespace:      default
StorageClass:   portworx-sc
Status:         Bound
Volume:         pvc-e5578707-c626-11e6-baf6-08002729a32b
Labels:         <none>
Capacity:       2Gi
Access Modes:   RWO
No Events.
Step 3: Create Pod which uses the Persistent Volume Claim with storage class.
Create the pod :
kubectl create -f examples/volumes/portworx/portworx-volume-pvcscpod.yamlExample :
apiVersion: v1
kind: Pod
metadata:
  name: pvpod
spec:
  containers:
  - name: test-container
    image: gcr.io/google_containers/test-webserver
    volumeMounts:
    - name: test-volume
      mountPath: /test-portworx-volume
  volumes:
  - name: test-volume
    persistentVolumeClaim: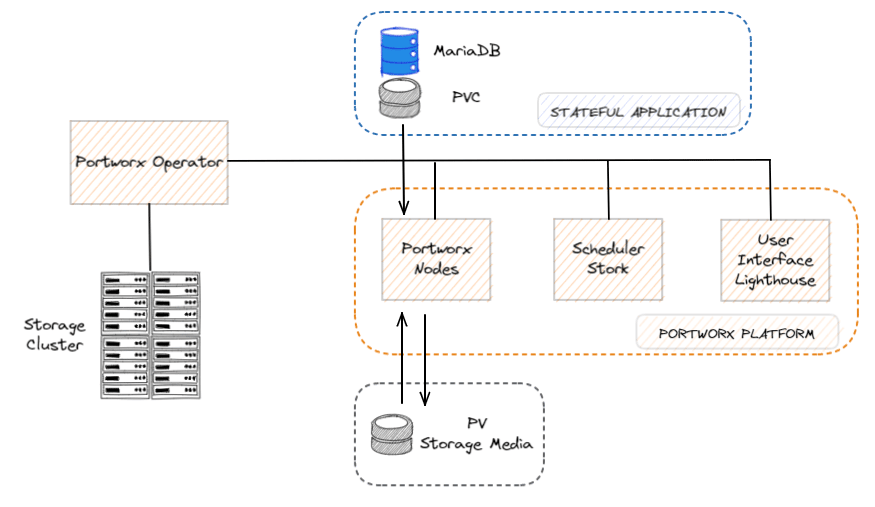
claimName: pvcsc001As we discussed in a previous blogpost, Kubernetes Operators add an endpoint to the Kubernetes API, called a custom resource definition (CRD), along with a control plane component that monitors and maintains resources defined by the CRD.
Portworx Operator exists and helps you install, configure, and update Portworx.
As shown in the diagram below, the Operator manages the Portworx platform consisting of the Portworx nodes, the Stork scheduler, the Lighthouse UI and other components that make running stateful applications seamless for the users :
PXCTL is the command line utility, used for viewing and configuring changes to the Portworx solution. It can be related to the Portworx cluster, volumes, snapshots, migrations, alerts, secrets, roles, credentials, etc.
Here are some basic commands :
# Print help
$ pxctl help

# Check Status of the Cluster
$ pxctl status

# Check Status of the Cluster in a JSON format
$ pxctl status --json

# List nodes in the cluster, Cluster ID, Cluster UUID
$ pxctl cluster list
# Inspect node
$ pxctl cluster inspect

# Example of how to create a volume
$ pxctl volume create <volname> -s <size default 1GB>

# List number of volumes
$ pxctl volume list

# Snapshot the volume
$ pxctl volume snapshot create --name <SnapName> <VolName>

# List storage pools
$ pxctl service pool show

# Update pool IO priority
$ pxctl service pool update --io_priority=medium 0

# Create a volume called user_volume with 2 replicas and size = 2GB
$ pxctl volume create user_volume -r 2 -s 2

# Create a shared volume
$ pxctl volume create user_volume --shared yes

# Create a volume with 2 replicas
$ pxctl volume create rep_volume --repl 2

# Create a volume with aggregation (split over 3 nodes for better performance and capacity)
$ pxctl volume create vol_b --aggregation_level 3

# Delete a volume
$ pxctl volume delete user_volume

# Attach volume to host
$ pxctl host attach testvol

# Detach volume from host
$ pxctl host detach testvol

# Mount volume
$ pxctl host mount testvol --path /var/lib/osd/mounts/testvol

# Unmount volume
$ pxctl host unmount testvol --path /var/lib/osd/mounts/testvol As described in this survey, Storage and Cross DataCenter are known as top challenges to overcome with containers.
As many companies have already moved stateless workloads to containers first, it makes sense that they are still investing in solutions for stateful services as they increase their container adoption.
Portworx is one of those solutions among others such as Longhorn, StorageOS, Rook, OpenEBS or Diamanti.
Each solution has – of course – pros and cons but, in my opinion, the most important drivers to choose a storage solution for Containers & Kubernetes are the following: