
By Lionel Gurret.
In the Agile world, development teams are required to reduce delivery time as much as possible while continuously improving the quality of the code produced.
Indeed, it is important that at each release, the version is documented, tested, validated and secure before being deployed.
For this, it is important that these steps are integrated as early as possible in the continuous integration pipeline before even reaching the testing teams.
We use the term "shift left testing".
The attention paid to code quality is different from a traditional approach, which is established late, mainly before the deployment of the application:
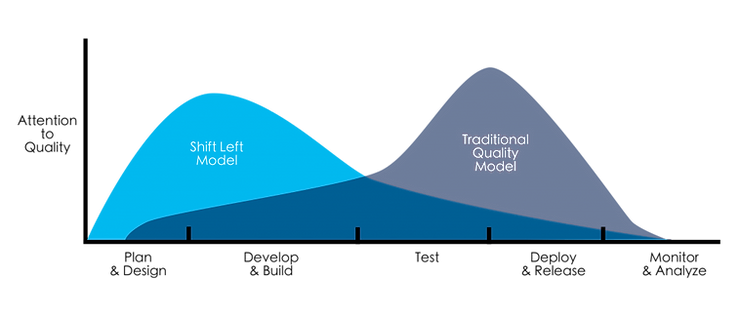
Source: https://devopedia.org/shift-left
In a "shift left testing" approach, we take into account the quality and security of the code from the development environment:
The benefits of such approach are numerous:
It is important to remember that this should in no way replace security and code quality checks during CI. This practice improves productivity by pushing pre-tested code before validation during a Pull Request.
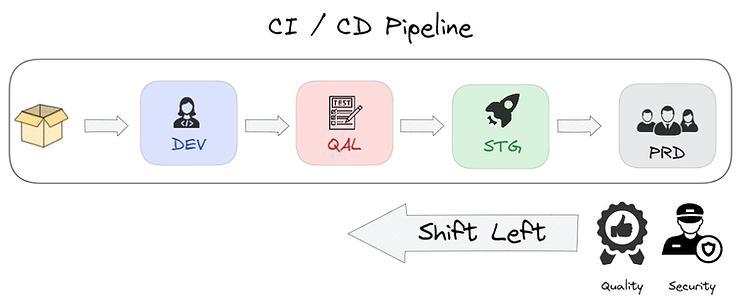
In this article, we will detail this approach in the context of IaC (Infrastructure as Code) with Terraform.
The goal would be to integrate into our CI/CD chain tools to test and validate the quality and security of our Terraform code as soon as possible.
We will see that it is possible to automatically launch some of these tools even before the code is pushed into the GIT repository by the developer.
Before getting into the heart of the matter, it seems important to me to recall certain Terraform best practices directly related to the subject of this blog post.
In our context of shift left testing, it would be wise to integrate the following aspects as soon as possible:
I also invite you to consult this site dedicated to the use of this tool for more information on good practices.
Using GIT pre-commits allows you to call hooks before each commit that will automatically launch custom scripts or commands.
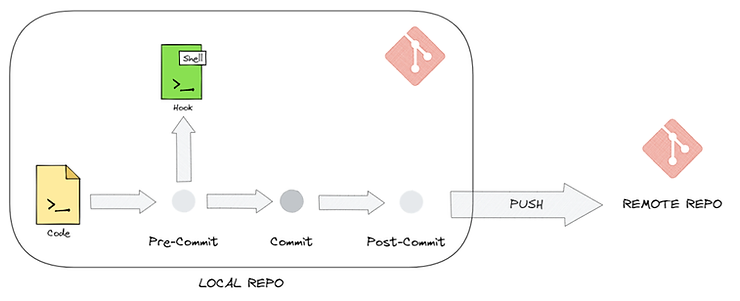
These will allow us, for example, to check the syntax of our Terraform code, or as seen previously, to test the security and quality of the code.
To be able to use the pre-commits, it is necessary to install the pre-commit package on your development environment (here WSL).
Just run the following pip command:
pip install pre-commitThese two tools integrated into the Terraform CLI will allow us to format our code and validate it before using it.

| Description | Documentation |
|---|---|
| Checkov is a static code analysis tool for Infrastructure as Code. It scans cloud infrastructure provisioned using Terraform, Terraform plan, Cloudformation, AWS SAM, Kubernetes, Helm charts, Kustomize, Dockerfile, Serverless, Bicep or ARM Templates and detects security and compliance configuration errors. | Checkov |
Example :
By running the following command on a Terraform project provisioning resources in the Azure cloud, we can get extensive Checkov analysis on our code.
checkov --directory my_terraform_directoryTo begin, Checkov displays the result of its analysis (here 16 validated points but 40 problematic) as well as the details of the validated points:
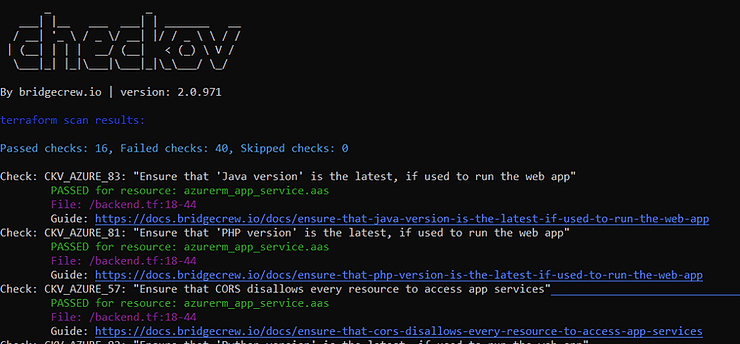
Then, the improvement points are displayed with a direct link to the documentation to improve its Terraform manifests:
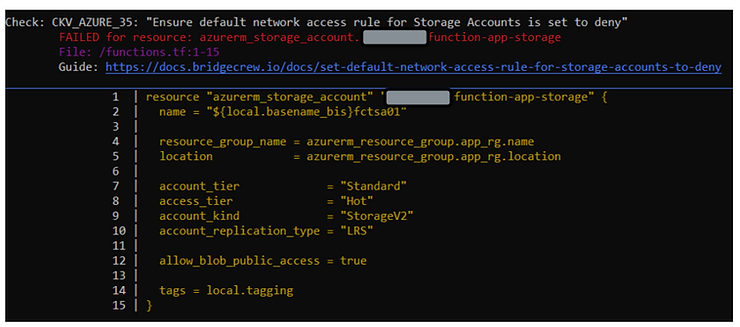
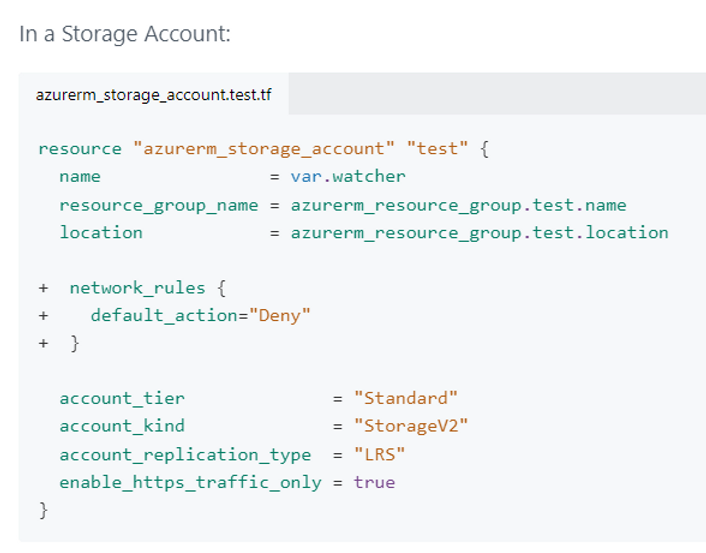
As you can see from the documentation provided by Checkov, the storage account should contain a network access rule, set to _deny _by default:
| Description | Documentation |
|---|---|
| This utility allows to generate documentation from Terraform modules in various output formats (json, asciidoc, pretty, xml etc.). | terraform-docs |
Example :
In this example, we will generate documentation in markdown format based on Terraform code used to provision AWS and Consul resources.
Just go to our directory containing our Terraform manifests and run the following command:
terraform-docs markdown table . > Readme.mdThe content of our generated file is as follows:
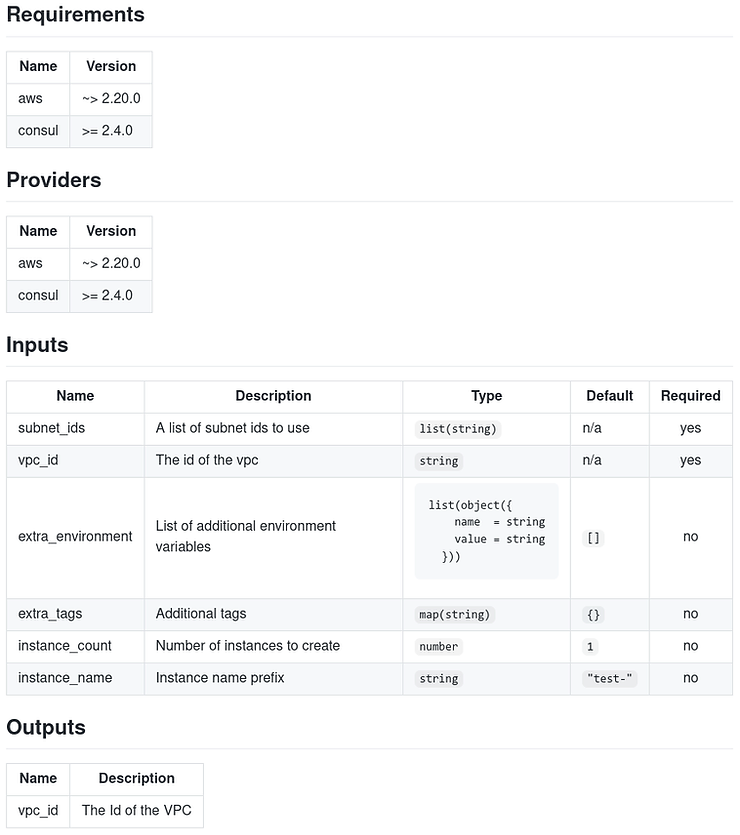
We observe the generation of a complete documentation, containing all the Terraform blocks organized in the form of detailed tables!
By the way, If you add the following tags to your Readme.md, your terraform documentation will automatically be pushed between these tags!
    <!-- BEGINNING OF PRE-COMMIT-TERRAFORM DOCS HOOK -->

    <!-- END OF PRE-COMMIT-TERRAFORM DOCS HOOK -->
This allows you to keep a static part in your documentation and let terraform-docs dynamically fill in the part relating to Terraform.

| Description | Documentation |
|---|---|
| Terragrunt provides additional features to keep your configurations DRY ("Don’t Repeat Yourself"), work with multiple Terraform modules, and manage state remotely. | terragrunt |
Example :
It is possible to take advantage of Terragrunt (via its terragrunt.hcl file) in different situations:
In the context of this article, I did not use Terragrunt. However, pre-commit-terraform allows it to be integrated.

| Description | Documentation |
|---|---|
| Terrascan is a static code analyzer for Infrastructure as Code to detect misconfigurations, security vulnerabilities, and compliance violations. | terrascan |
Example :
By running the following command in a directory containing our Terraform manifests:
terrascan scanWe can observe some points of improvement detected by terrascan.

We observe here 3 non-conformities including 2 critical ones.
One of the advantages of terrascan is that it presents the different possible improvements with levels of criticality. This point can allow, for example, to block a pipeline when a point considered critical by terrascan is detected.
| Description | Documentation |
|---|---|
| TFLint allows to detect certain errors (like illegal instance types) for the main cloud providers (AWS/Azure/GCP). This tool detects obsolete syntaxes, unused declarations. , including naming conventions. | tflint |
Example :
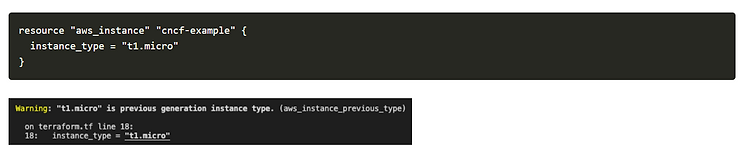
In this example, TFLint automatically detects that the syntax used in the Terraform manifests for AWS is deprecated (in this case the instance type):
This tool will allow us to automatically observe changes in cloud providers and then adapt our code to avoid using obsolete resources or declaring variables unnecessarily.

| Description | Documentation |
|---|---|
| tfsec uses static analysis of your terraform models to detect potential security issues. | tfsec |
Example :
In this example, tfsec detects a critical vulnerability related to an azure storage container:
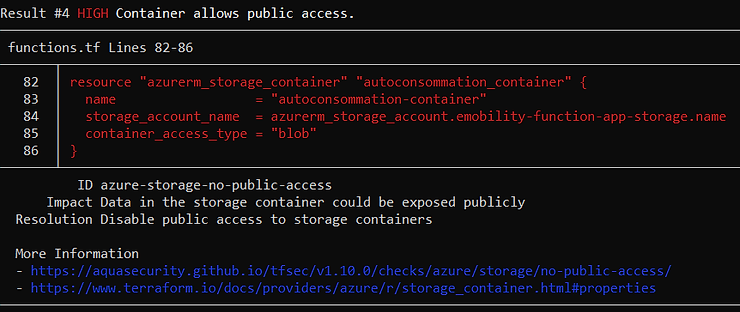
Links are provided to remedy the various problems.
Like terrascan, tfsec classifies issues by severity. This point can be used, for example, to block a pipeline when a point considered critical is detected.

| Description | Documentation |
|---|---|
| Warning, in order to use infracost, it is necessary to install jq beforehand! Infracost displays cloud cost estimates for Terraform. It allows DevOps, SREs, and engineers to understand costs before making changes, whether in the terminal or pull requests. | infracost |
Example :
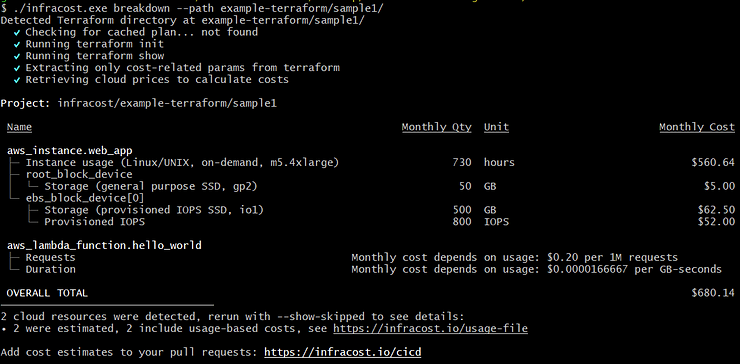
By using infracost, it is first possible to display the total cost of our infrastructure.
Here an AWS example:
Then it is possible, using the _diff _argument, to estimate the price reflected by our changes:
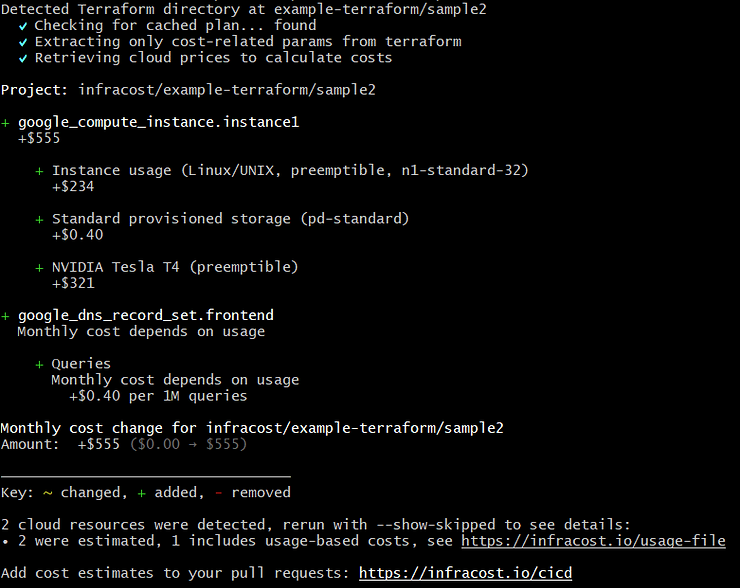
This tool is therefore intended to display the total price of our infrastructure or to measure the financial impact of changes made to our manifests. It is therefore possible to take advantage of this to block a Terraform pipeline when the costs generated by our modifications are too high and thus avoid hazardous expenses.
In my opinion, this kind of tool has more of its place in CI than in the development environment.
Indeed, to launch a cost estimate on their own laptop, the developer must keep the API keys locally. It seems to me more interesting to deal with this point, from a global point of view in the CI/CD pipeline.
Now that we have described the different tools called by terraform-pre-commit, we can get down to business: using these tools in GIT pre-commits!
For this, it is important to have:
Run the following commands to globally install the pre-commit hook:
# Initialisation de pre-commit
DIR=~/.git-template
git config --global init.templateDir ${DIR}
pre-commit init-templatedir -t pre-commit ${DIR}

# Création de la configuration de pre-commit (exemple)
cat <<EOF > .pre-commit-config.yaml
repos:
- repo: https://github.com/antonbabenko/pre-commit-terraform
  rev: v1.64.0 # Get the latest from: https://github.com/antonbabenko/pre-commit-terraform/releases
  hooks:
    - id: terraform_fmt
      args:
        - --args=-no-color
        - --args=-diff
        - --args=-write=false
    - id: terraform_docs
      args:
        - --hook-config=--create-file-if-not-exist=true # you can pass args to hooks !
    - id: checkov
    - id: terrascan
    - id: terraform_tfsec
    # - To complete ! Use what you want / need !!!
EOF
We can now test our pre-commit hook!
pre-commit run -aWe observe that our tools are automatically called.
Terraform fmt and Terraform docs did not encounter any problems but tfsec detected security flaws in our code:
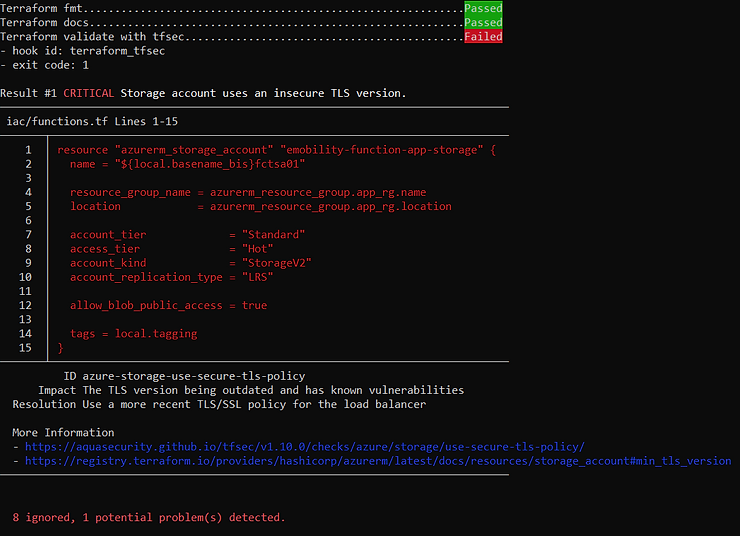
In this example, before the developer can push their code to the GIT repository, the latter has been formatted, documented and tested!
Do not hesitate to consult the pre-commit-terraform documentation to know all the possible configurations!
As we have seen, it is relatively simple to add and take advantage of pre-commits in a Terraform development context. This best practice will allow us to move security testing earlier in our CI pipeline.
However, there is always the possibility of ignoring pre-commits (git commit . -m ‘quick fix’ –no-verify or simply not installing the necessary tools.)
So it is very important not to ignore these tools in our CI pipelines!
It may therefore be wise not to make the process too complicated for developers. For example by limiting to code formatting, validation and critical flaws detected by tools such as TFSec or Checkov. The code submitted during Pull Requests will only be cleaner and at least tested.
https://www.terraform-best-practices.com/
https://www.youtube.com/watch?v=ziJK79tI6tY