
By Lionel Gurret.
Sokube teams recently had the opportunity to migrate an on-premise TFS Server infrastructure to Azure DevOps Services cloud offering.
There are many reasons why you might want to do this:
In this article, we will detail the different steps necessary for the migration process and then we will share our feedback and the difficulties encountered.
The following workflow illustrates the different stages of the migration process that we will analyze:
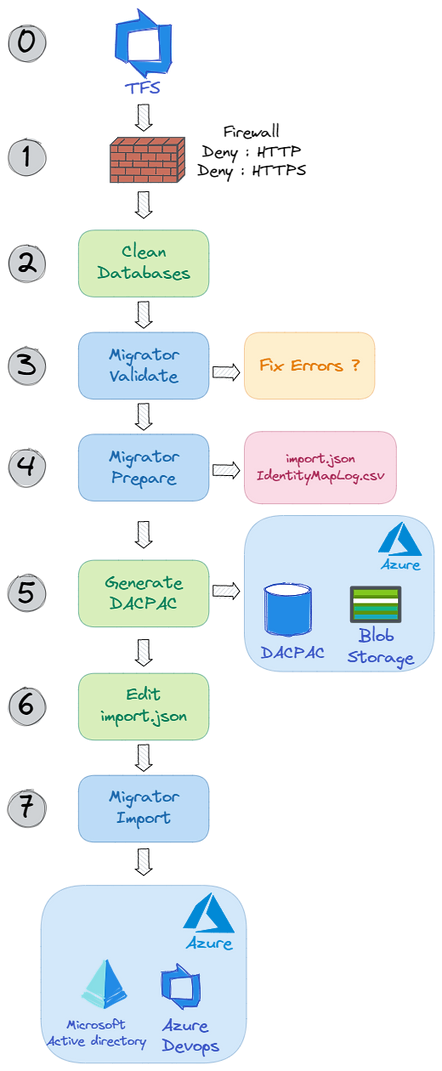
0 – Azure DevOps Server (TFS) Update
Before you can start the migration, it is necessary to have a recent version of Windows (Windows 2019) and a recent version of Azure DevOps Server (2020).
No difficulty encountered. It is important to provide enough hardware resources (disk, CPU, RAM) for the operation.1- Firewall modification
The first step of our migration consists in cutting the firewall (port 80 and 443) on the production (local and/or external firewall) in order to avoid modifications on the different TFS collections.
2 – Cleaning the collections databases
This step is the most important. Indeed, significantly reducing the size of your collections will allow you to migrate more easily and quickly to Azure DevOps Services.
All the necessary commands to optimize the size of your collections are nicely detailed in the following article : How to reduce the size of your TFS/Azure DevOps Server collection databases
Data volumes should not exceed 30GB per collection. If this is not the case, it is advisable to go through an intermediate Azure server to perform the migration. Using these queries we were able to reduce the size of collections from 110GB to 20GB!3 – Validation of the data to be migrated
We can now operate the actual data transfer. The first step before uploading a dataset into Azure DevOps is to validate it on Azure DevOps Server 2020.
    Migrator validate /collection:{Collection URL} /tenantDomainName:{Name}

    The migrator should ask you to configure, configure the time zone that corresponds to the time zone of your Azure Tenant. (ex: WEU) In order to be able to continue the migration process, please resolve all the errors reported by the migrator. Here is some helpful [documentation ](https://aka.ms/AzureDevOpsImportTroubleshooting)for the various known errors. On our side, we only had one warning related to a “database collation” which could be ignored.
4 – Preparing for migration
This step is similar to the previous one. Here we will generate the import.json and IdentityMapLog.csv files, used by the migration tool.
    Migrator prepare /collection:{Collection URL} /tenantDomainName:{Name}

    Answer the various questions of the wizard, then validate the IdentityMapLog file. Correct on Azure Active Directory the account or accounts that would not have been synchronized. We had no problem, all accounts were well synchronized!
5 – Generating a DACPAC file
To be able to transfer the data present in our databases, it is necessary to generate a [DACPAC ](https://docs.microsoft.com/en-us/sql/relational-databases/data-tier-applications/data-tier-applications?view=sql-server-ver15)file from the SQL Server databases. This file contains a collection of XML files that define the schema and the data to transfer. It will be used by Azure DevOps Services for migration.Steps to perform:cd "C:Program Files (x86)Microsoft Visual Studio2019CommunityCommon7IDEExtensionsMicrosoftSQLDBDAC130"
SqlPackage.exe /sourceconnectionstring:"Data Source=localhost;Initial Catalog={COLLECTION DB NAME};Integrated Security=True" /targetFile:{DACPAC FILE PATH} /action:extract /p:ExtractAllTableData=true /p:IgnoreUserLoginMappings=true /p:IgnorePermissions=true /p:Storage=MemoryYou must then copy your DACPAC to an Azure blob container storage.
This operation can be done manually via the Azure Container Explorer or more quickly using AZCopy:
azcopy make 'https://<storage-account-name>.file.core.windows.net/<file-share-name><SAS-token>'6 – Editing the import.json file
In step 4, an import.json file was generated in the folder C:migrationLogsCollection-NameDate.
Open the file and complete it for the dry-run migration:
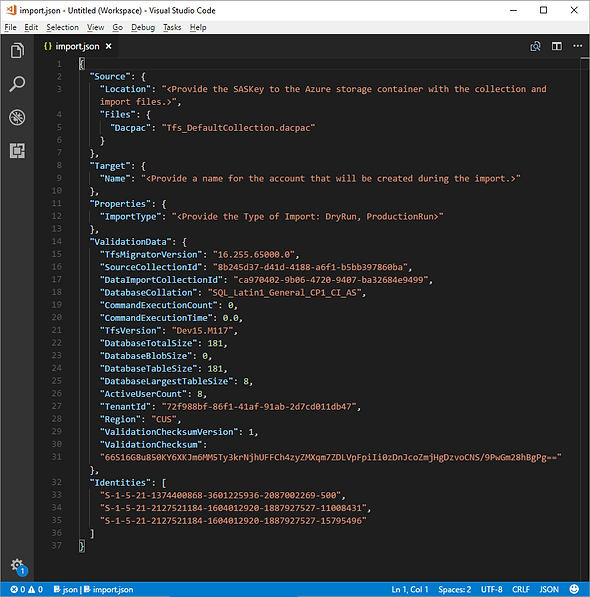
Replace the following fields:
With a dry-run migration, you ensure that the migrated data will be automatically deleted between 15 and 21 days after migration.7 – Launching the migration
Now run the following command for each of your collections:
Migrator import /importFile:C:migrationLogsCollectionXXXXXimport.jsonA link will be provided to follow the import progress:
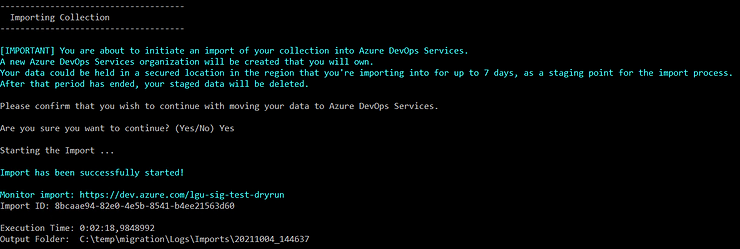
Once the migration has started and is complete, an email will be sent.
We experienced high variance in durations for the same interventions and the same data volumes (from 3 to 10 hours.) These variations are largely explained by the fact that there is no control over the schedule used by Azure platform to perform the migration, this could happen during peek hours.You can now validate the migrated data with your users before proceeding to the final intervention.
Once the databases are reduced, the Azure DevOps migration process is very reliable.
Nevertheless, several points must be taken into account to perform succesfully such a migration:
How to reduce the size of your TFS/Azure DevOps Server collection databases
Migrating from TFS to the Cloud… Without Losing Your Mind
Azure DevOps Server to Services Migration overview – Azure DevOps