
By Sami Amoura.
Amazon Web Services (AWS) offers a service to deploy a fully managed Kubernetes cluster. This service is called Amazon Elastic Kubernetes Service (EKS). Amazon EKS gives you the flexibility to start, run, and scale Kubernetes applications in the AWS cloud or on-premises. Amazon EKS helps you provide highly-available and secure clusters and automates key tasks such as patching, node provisioning, and updates. Amazon EKS is a managed service that you can use to run Kubernetes on AWS without needing to install, operate, and maintain your own Kubernetes control plane or nodes. AWS provides a complete and autonomous Control Plane we can’t access, as it runs nodes behind the scene. It’s the principle of a managed cluster.
In this tutorial, we will demonstrate how to provision a functional EKS managed cluster on Amazon Cloud. To be as efficient as possible and respect DevOps best practices we will use Infrastructure as Code (IaC) with AWS CloudFormation.
AWS CloudFormation is a very efficient tool to provision numerous resources with a declarative language stored in manifest file in YAML or JSON format.
For this tutorial, we will need an AWS account (if you don’t have one AWS account you can create it here) with both administrator and programmatic accesses to use AWS CLI (you can follow this tutorial to create a programmatic access and get credentials).
This tutorial will be done on Linux and you will need to install AWS CLI version 2 package to interact with the AWS API. To install this package on Linux you can follow this tutorial. To perform operations and interact with AWS you need to configure basic settings for AWS CLI like security credentials, AWS Region or default output format. You can quickly set up AWS CLI with the official documentation.
You will need the SCM git a client to retrieve source code from GitHub. For git installation you can check this tutorial with several installation types.
To interact with the EKS Cluster, you need to install the Kubernetes command line tool : kubectl. To install this utility you can refer to the official Kubernetes documentation. For this article you will need kubectl version 1.18.
This tutorial demonstrates how to create a managed Kubernetes cluster EKS with AWS CloudFormation. This will be done in 3 main steps in CloudFormation manifest:
In this section, to follow AWS recommendations and best practices for a production cluster, we will set up network environment by creating different resources like Virtual Private Cloud (VPC), Internet Gateway (IGW), Route Table, Routes, Subnets and Security Groups (SG).
Then in this section, we will create : IAM Cluster (Control Plane) Role, provision EKS Control Plane, IAM Node Group Role and provision Node Group (Node Group is the name given by AWS to describe group of worker nodes).
Finally we will deploy a simple web application in the EKS Cluster to verify that it’s working as expected.
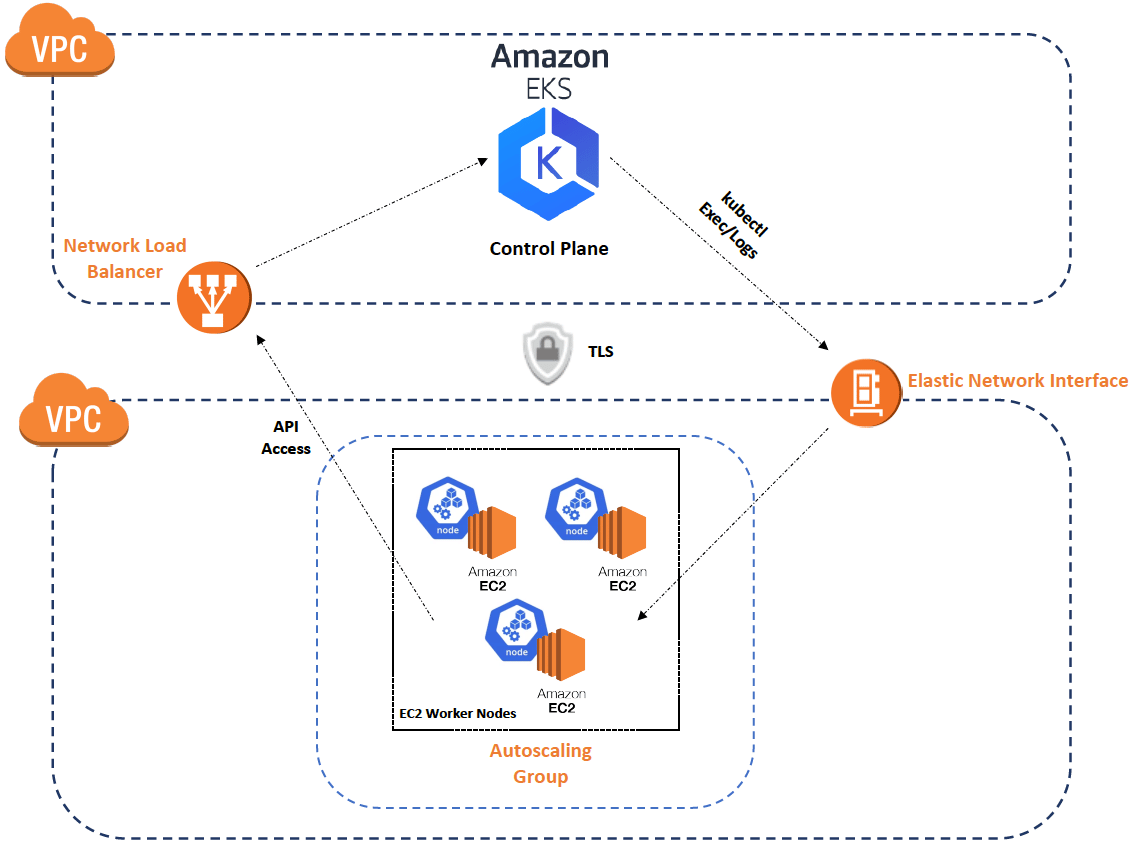
EKS Architecture for Control Plane and Worker Node communication
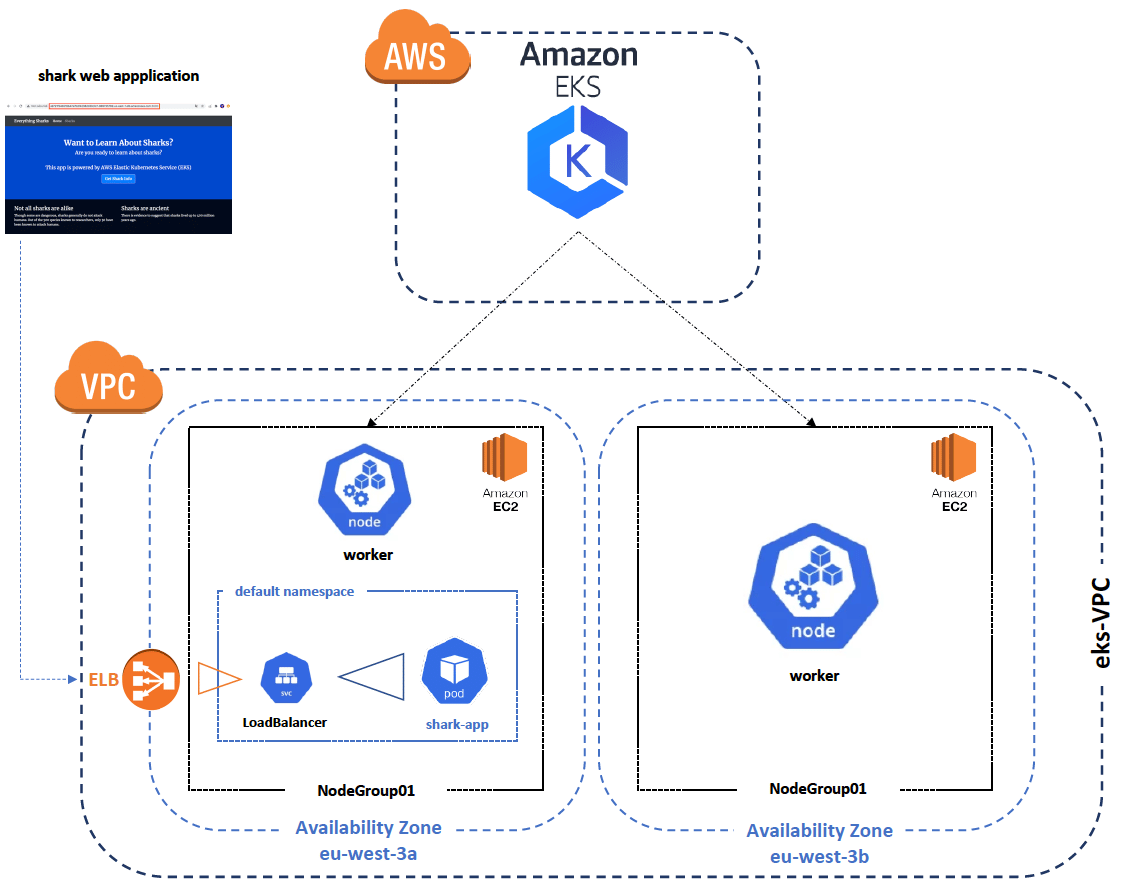
EKS Project Architecture
CloudFormation template is composed of 3 main sections :
Across this section, we will describe and explain each declared resource in the Resources section of the CloudFormation manifest in order to create the EKS Cluster.
To deploy the EKS Cluster, AWS recommends to create your own dedicated and isolated Virtual Private Cloud (VPC). Create a VPC called eks-VPC with the following declaration:
Resources:
  eksVPC:
    Type: AWS::EC2::VPC
    Properties:
      CidrBlock: 10.0.0.0/16
      EnableDnsSupport: true
      EnableDnsHostnames: true
      Tags:
        - Key: Name
          Value: eks-VPC
        - Key: Project
Value: aws-eksIn AWS, an Internet Gateway (IGW) is a resource that allows communication between your VPC and internet. This will allow internet access for worker nodes. For more information, you can read the official documentation.
Create an Internet gateway eks-InternetGateway with the following declaration:
...
  InternetGateway:
    Type: AWS::EC2::InternetGateway
    Properties:
      Tags:
        - Key: Name
          Value: eks-InternetGateway
        - Key: Project
          Value: aws-eks
To associate the previously eks-InternetGateway to the eks-VPC, we need to attach both resources. Let’s attach the Internet Gateway to the the VPC with the following declaration:
...
  eksVPCGatewayAttachment:
    Type: AWS::EC2::VPCGatewayAttachment
  Properties:       InternetGatewayId: !Ref eksInternetGateway
      VpcId: !Ref eksVPC
The AWS intrinsic !Ref function returns the value of the specified parameter or resource. Here, we use the function to retrieve dynamically the ID of eks-InternetGateway and eks-VPC previously created.
A public route table is necessary to declare all routes that will be used by the VPC. When the eks-VPC is created, a main Route Table is also created, but AWS doesn’t recommend to use the main Route Table of the VPC. The main route table can have explicit and implicit subnet associations. Custom route tables have only explicit associations. This ensures that you explicitly control how each subnet routes traffic. So, we will need to create a custom eks-RouteTable for the eks-VPC with the following declaration:
...
  eksPublicRouteTable:
    Type: AWS::EC2::RouteTable
    Properties:
      VpcId: !Ref eksVPC
      Tags:
        - Key: Name
          Value: eks-RouteTable
        - Key: Project
          Value: aws-eks
Then we need to declare the Public Route in the eks-RouteTable to enable internet access from the eks-VPC. Create the Public Route with the following declaration:
...
  eksPublicRoute:
    DependsOn: eksVPCGatewayAttachment
    Type: AWS::EC2::Route
    Properties:
      RouteTableId: !Ref eksPublicRouteTable
      DestinationCidrBlock: 0.0.0.0/0
      GatewayId: !Ref eksInternetGateway
This route is added to the eks-RouteTable with RouteTableId toward internet with the DestinationCidrBlock 0.0.0.0/0 by the GatewayId eks-InternetGateway.
The eksPublicRoute resource required by the Internet Gateway has been successfully attached to the VPC before the creation. The DependsOn directive ensures the eksVPCGatewayAttachment has been successfully created before to create this resource.
AWS provides a principle of Availability Zone (AZ) to increase High-Availability, Fault-Tolerance and Reliability. To deploy an EKS Cluster it’s mandatory to create at least two subnets in two different AZs. Each worker node will be deployed in both different AZ.
To meet requirements, to be closer to your European customers or to be compliance and meet legal requirements, we will work in the AWS Region Europe (Paris). This AWS region corresponds to the code name eu-west-3, which is made up of 3 Availability Zones:
In this tutorial, we will use eu-west-3a and eu-west-3b Availability Zones.
The first Subnet eks-PublicSubnet01 will be created in the Availability Zone eu-west-3a. Let’s create an eks-PublicSubnet01 with the following declaration :
...
  eksPublicSubnet01:
    Type: AWS::EC2::Subnet
    Properties:
      AvailabilityZone: eu-west-3a
      MapPublicIpOnLaunch: true
      CidrBlock:
        Ref: 10.0.0.0/24
      VpcId:
        Ref: eksVPC
      Tags:
        - Key: Name
          Value: eks-PublicSubnet01
        - Key: Project
          Value: aws-eks
The eks-PublicSubnet01 is created in the eu-west-3a Availability Zone, with automated Public Address IP allocation MapPublicIpOnLaunch, the CIDR block range of this subnet is 10.0.0.0/24 and this subnet is attached to the eks-VPC.
The second Subnet eks-PublicSubnet02 will be created in the Availability Zone eu-west-3b. Let’s create an eks-PublicSubnet02 with the following declaration :
...
  eksPublicSubnet02:
    Type: AWS::EC2::Subnet
    Properties:
      AvailabilityZone: eu-west-3b
      MapPublicIpOnLaunch: true
      CidrBlock:
        Ref: 10.0.1.0/24
      VpcId:
        Ref: eksVPC
      Tags:
        - Key: Name
          Value: eks-PublicSubnet02
        - Key: Project
          Value: aws-eks
The eks-PublicSubnet02 is created in the eu-west-3b Availability Zone, with automated Public Address IP allocation MapPublicIpOnLaunch, the CIDR block range of this subnet is 10.0.1.0/24 and this subnet is attached to the eks-VPC.
To allow internet access for worker nodes from each subnet it’s necessary to associate each Public Subnet to the eks-RouteTable. Associate eksPublicSubnet01 and eksPublicSubnet02 subnets to the eks-RouteTable with the following declaration :
...
  eksPublicSubnet01RouteTableAssociation:
    Type: AWS::EC2::SubnetRouteTableAssociation
    Properties:
      SubnetId: !Ref eksPublicSubnet01
      RouteTableId: !Ref eksPublicRouteTable

  eksPublicSubnet02RouteTableAssociation:
    Type: AWS::EC2::SubnetRouteTableAssociation
    Properties:
      SubnetId: !Ref eksPublicSubnet02
      RouteTableId: !Ref eksPublicRouteTable
Security Groups (SG) is a set of rules with fine granularity to allow, restrict or deny communication towards a resource. A cluster security group is designed to allow all traffic from the control plane and managed node groups to flow freely between each other. Finally, create a Security Group to allow communication between EKS Control Plane and worker nodes with the following declaration :
...
  eksSecurityGroup:
    Type: AWS::EC2::SecurityGroup
    Properties:
      GroupDescription: Cluster communication with worker nodes
      VpcId: !Ref eksVPC
      Tags:
        - Key: Name
          Value: eks-SecurityGroup
        - Key: Project
          Value: aws-eks
The network implementation is done. This is an important section because it allows to create your own isolated and secure network for the EKS Cluster. It shows also how to establish communication between the VPC and several subnets.
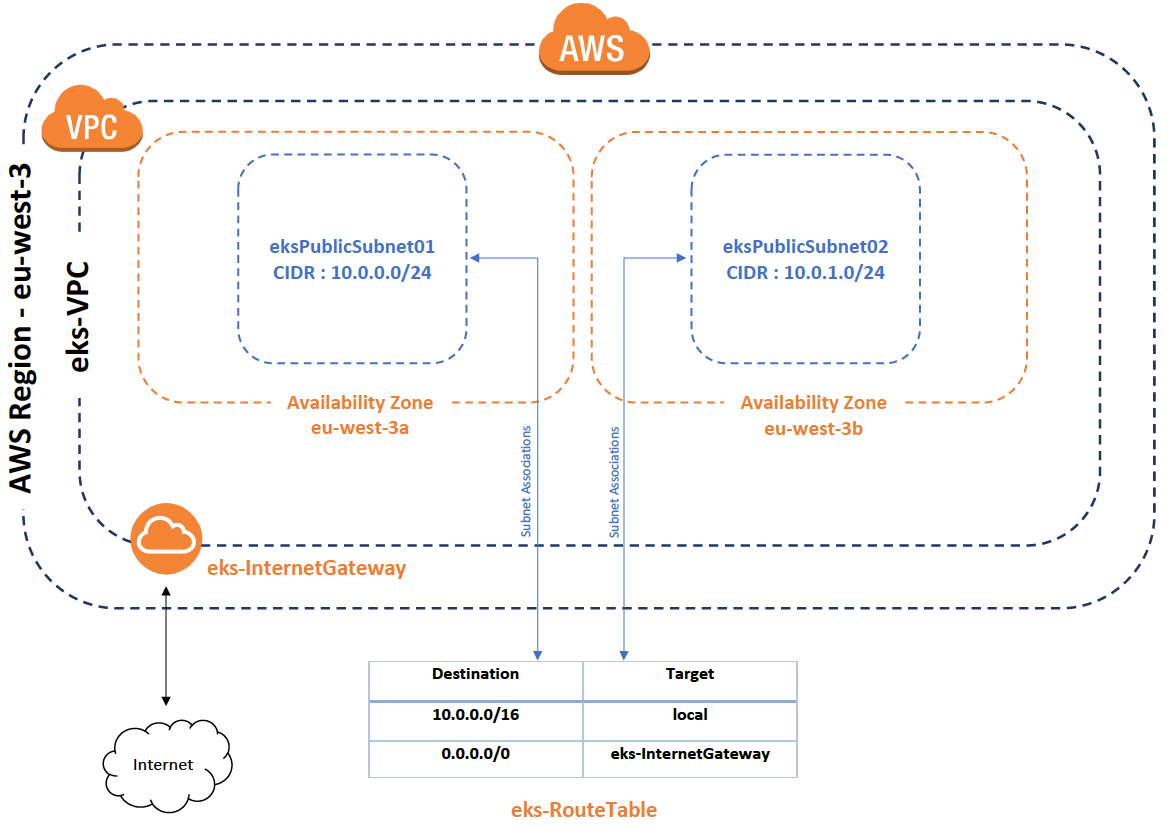
You can view the network architecture with the declaration of all network resources :
In this section we will show and explain necessary declarations to provision EKS Control Plane and Node Group (worker nodes).
Kubernetes clusters managed by Amazon EKS require access to other AWS services on your behalf to manage the resources that you use with the service. Before you can create Amazon EKS clusters, you must create/declare an IAM role with the IAM policies AmazonEKSClusterPolicy :
...
  eksIAMRole:
    Type: AWS::IAM::Role
    Properties:
      AssumeRolePolicyDocument:
        Version: '2012-10-17'
        Statement:
          - Effect: Allow
            Principal:
              Service:
              - eks.amazonaws.com
            Action:
            - 'sts:AssumeRole'
      RoleName: EKSClusterRole
      ManagedPolicyArns:
- arn:aws:iam::aws:policy/AmazonEKSClusterPolicyNow, we can create an EKS Control Plane, named EKS with the following declaration :
...
  eksCluster:
    Type: AWS::EKS::Cluster
    Properties:
      Name: EKS
      Version: 1.18
      RoleArn:
        "Fn::GetAtt": ["eksIAMRole", "Arn"]
      ResourcesVpcConfig:
        SecurityGroupIds:
          - !Ref eksSecurityGroup
        SubnetIds:
          - !Ref eksPublicSubnet01
          - !Ref eksPublicSubnet02
    DependsOn: [eksIAMRole, eksPublicSubnet01, eksPublicSubnet02, eksSecurityGroup]
The name of the EKS Cluster is EKS, with the 1.18 Kubernetes version. It uses the EKSClusterRole role previously declared. The EKS cluster uses the eks-SecurityGroup to allow communication in the cluster and the resources will be deployed in two different AZs eksPublicSubnet01 and eksPublicSubnet02 .
The last directive DependsOn is important. It means the EKS Cluster will be deployed only after all declared resources : EKSIAMRole, eksPublicSubnet01, eksPublicSubnet02, eksControlPlaneSecurityGroup have been successfully deployed. This constraint directive prevents errors during the deployment of the CloudFormation stack.
The Amazon EKS node kubelet daemon makes calls to AWS APIs on your behalf. Nodes receive permissions for these API calls through an IAM instance profile and associated policies. Before you can create nodes and register them into a cluster, you must create an IAM role for those nodes to use when they are created. This requirement applies to nodes launched with the Amazon EKS optimized AMI provided by Amazon, or with any other node AMIs that you intend to use. Before you create nodes, you must create an IAM role with the following IAM policies:
The AmazonEKS_CNI_Policy policy must be attached to either this role or to a different role that is mapped to the aws-node Kubernetes service account. We recommend assigning the policy to the role associated to the Kubernetes service account instead of assigning it to this role. For more information, see Walkthrough: Updating the VPC CNI plugin to use IAM roles for service accounts
...
  eksNodeInstanceRole:
    Type: AWS::IAM::Role
    Properties:
      AssumeRolePolicyDocument:
        Version: "2012-10-17"
        Statement:
          - Effect: Allow
            Principal:
              Service:
                - !FindInMap [ServicePrincipals, !Ref "AWS::Partition", ec2]
            Action:
              - "sts:AssumeRole"
      ManagedPolicyArns:
        - !Sub "arn:${AWS::Partition}:iam::aws:policy/AmazonEKSWorkerNodePolicy"
        - !Sub "arn:${AWS::Partition}:iam::aws:policy/AmazonEKS_CNI_Policy"
        - !Sub "arn:${AWS::Partition}:iam::aws:policy/AmazonEC2ContainerRegistryReadOnly"
Path: /Finally, to create a multi nodes EKS Cluster, we must create a Node Group (worker nodes) to deploy workloads. Create a Node Group named NodeGroup01 with the following declaration :
...
  eksNodeGroup:
    Type: AWS::EKS::Nodegroup
    Properties:
      ClusterName: EKS
      NodeRole:
        "Fn::GetAtt": ["eksNodeInstanceRole", "Arn"]
      AmiType: AL2_x86_64
      InstanceTypes:
        - t3.medium
  NodegroupName:  NodeGroup01       RemoteAccess:
        Ec2SshKey: my-eks-key
      ScalingConfig:
        MinSize: 1
        DesiredSize: 2
        MaxSize: 7
      Labels:
        Project: aws-eks
      Subnets:
        - !Ref eksPublicSubnet01
        - !Ref eksPublicSubnet02
    DependsOn: [eksCluster, eksNodeInstanceRole]
The name of the Node Group is NodeGroup01, this Node Group is attached to EKS Cluster with the ClusterName directive. The group of worker nodes uses the NodeInstanceRole role previously declared.
Worker Nodes are EC2 instances, to access them AWS recommends authentication with a EC2 key pair. We will use a public key named my-eks-key (we will create an ssh key pair just after). For this hands-on our Node Group will contain 2 worker nodes. We can modify the number of desired nodes with the ScalingConfig.DesiredSize directive.
AWS can provide automated scalability for our Node Group according to your workload by increasing or decreasing the number of worker nodes. We can define these limits with theses directives : ScalingConfig.MinSize and ScalingConfig.MaxSize. Instance type (InstanceTypes) provides a balance of compute, memory and networking resources, and can be used for a variety of diverse workloads of worker nodes. We can also define Amazon Machine Image (AMI) Type.
The worker nodes of NodeGroup01 will be deployed in two different Availability Zone eksPublicSubnet01 and eksPublicSubnet02.
As with EKS Cluster, the last directive DependsOn is important because it means the Node Group will be deployed only after all declared resources eksCluster, eksNodeInstanceRole has been successfully deployed.
All necessary resources to create a EKS Cluster have been declared. You can find the complete CloudFormation manifest on the SoKube GitHub repository.
N.B : The CloudFormation stack stored on GitHub is a bit different, because we have templated many directives with Parameter section to be agile and used in different environments.
In the next section, we will provision an EKS Cluster using the previously CloudFormation stack, deploy a simple web application on the cluster and expose them to test the EKS Cluster.
Retrieve code source from SoKube Git repository :
git clone https://github.com/sokube/aws-eks.git $HOME/aws-eks
cd $HOME/aws-eks/infrastructure-as-code
Define all variables for your EKS CloudFormation stack :
export EKS_STACK_NAME="eks"
export EKS_AWS_REGION="eu-west-3"
export EKS_KEY_PAIR_NAME="my-eks-key"
Create an EKS Key Pair :
aws ec2 create-key-pair
  --region $EKS_AWS_REGION
  --key-name $EKS_KEY_PAIR_NAME
  --tag-specifications 'ResourceType=key-pair,Tags=[{Key=Name,Value=eks-key-pair},{Key=Project,Value=aws-eks}]'
  --output text
  --query 'KeyMaterial' > $HOME/aws-eks/infrastructure-as-code/eks.id_rsa
Create the EKS Cluster with the following command :
aws cloudformation create-stack --stack-name $EKS_STACK_NAME
  --region $EKS_AWS_REGION
  --template-body file://$HOME/aws-eks/infrastructure-as-code/eks-cloudformation.yaml
  --capabilities CAPABILITY_NAMED_IAM
You can check the EKS cluster creation status with the following command. Until this loop is complete, the EKS Cluster is not ready.
started_date=$(date '+%H:%M:%S')
start=`date +%s`
while true; do
  if [[ $(aws cloudformation describe-stacks --region $EKS_AWS_REGION --stack-name $EKS_STACK_NAME --query "Stacks[*].StackStatus" --output text) == CREATE_IN_PROGRESS ]]
  then
    echo -e "EKS Cluster status : CREATE IN PROGRESS n"
    sleep 10
  elif [[ $(aws cloudformation describe-stacks --region $EKS_AWS_REGION --stack-name $EKS_STACK_NAME --query "Stacks[*].StackStatus" --output text) == CREATE_COMPLETE ]]
  then
    echo -e "EKS Cluster status : SUCCESSFULLY CREATED n"
    end=`date +%s`
    runtime=$((end-start))
    finished_date=$(date '+%H:%M:%S')
    echo "started at :" $started_date
    echo "finished at :" $finished_date
    hours=$((runtime / 3600)); minutes=$(( (runtime % 3600) / 60 )); seconds=$(( (runtime % 3600) % 60 )); echo "Total time : $hours h $minutes min $seconds sec"
    break
  else
    echo -e "EKS Cluster status : $(aws cloudformation describe-stacks --region $EKS_AWS_REGION --stack-name $EKS_STACK_NAME --query "Stacks[*].StackStatus" --output text) n"
    break
  fi
done
During the creation of the EKS Cluster, we should see :
EKS Cluster status : CREATE IN PROGRESS

EKS Cluster status : CREATE IN PROGRESS

EKS Cluster status : CREATE IN PROGRESS

...

EKS Cluster status : CREATE_COMPLETE

started at : 18:32:47
finished at : 18:47:30
Total time : 0 h 14 min 43 sec
Please note that the EKS Cluster can take up to 15-20 minutes to complete.
When the loop is terminated, ensure the EKS Cluster status is ACTIVE :
aws eks --region $EKS_AWS_REGION describe-cluster
  --name $EKS_CLUSTER_NAME
  --query "cluster.status"
  --output text
Congratulations! Your EKS Cluster is functional and ready to deploy workload. The next step is to ensure the EKS cluster works as expected.
To test the managed cluster, the first step is to generate and retrieve the kubernetes configuration file with credentials to interact with the EKS Cluster through the Kubernetes API.
Generate and create the kubeconfig file :
aws eks
  --region $EKS_AWS_REGION update-kubeconfig
  --name $EKS_CLUSTER_NAME
We should see :
Added new context arn:aws:eks:eu-west-3:123456789123:cluster/EKS to /home/admin/.kube/configThe kubeconfig file is automatically created or merged in the "$HOME/.kube/config"
You can now use kubectl command to operate the EKS Cluster. For example, you can retrieve information about worker nodes with the following command :
kubectl get nodeThe result must be similar to :
NAME           STATUS  ROLES   AGE    VERSION
ip-10-0-0-137  Ready   <none>  5m21s  v1.18.9-eks-d1db3c
ip-10-0-1-183 Ready <none> 5m35s v1.18.9-eks-d1db3cWe can interact with the EKS cluster. We will deploy a pod hosting a simple Node.js web application to validate that our EKS cluster works as expected. Right after that, we will expose this pod thanks to the Kubernetes LoadBalancer service to allow external users access this application. Within cloud platforms, it is recommended to use the external and managed cloud LoadBalancer service, instead of the internal load-balancer service you can deploy as part of the Kubernetes cluster.
Create an app-shark pod :
kubectl run app-shark
  --image=sokubedocker/shark-application:eks
  --restart=Never

pod/app-shark created
Create a LoadBalancer service on port 8080 to expose the app-shark pod with the following command :
kubectl expose pod app-shark --type=LoadBalancer --port=8080

service/app-shark exposed
The shark-app container in the pod is using port 8080.
Kubernetes is a fully Cloud Native tool and the previous kubectl command triggers the automated creation of an AWS Elastic Load Balancer (ELB). The ELB creation takes usually nearly 5 minutes before it can be used.
Waiting the ELB either available we can retrieve informations about created resources with the following command :
kubectl get pod,svc -o wideTo show and reach the shark-app we will need to get the AWS ELB Hostname (DNS Name). The app-shark application will be available on this address. Get the DNS Name of the ELB with the following command :
EKS_ELB_HOSTNAME=$(kubectl get svc app-shark -o jsonpath='{.status.loadBalancer.ingress[*].hostname}')
&& echo $EKS_ELB_HOSTNAME
We should see :
a92991fcaff2f4007ad28c27b27ef9e3-570659607.eu-west-3.elb.amazonaws.comWait for 5 minutes to the Elastic Load Balancer is up…
Once the ELB is created. We can either use :
curl http://$EKS_ELB_HOSTNAME:8080Paste the DNS Name "http://a92991fcaff2f4007ad28c27b27ef9e3-570659607.eu-west-3.elb.amazonaws.com:8080" in the web browser and add port 8080 to reach shark application.
We should see:
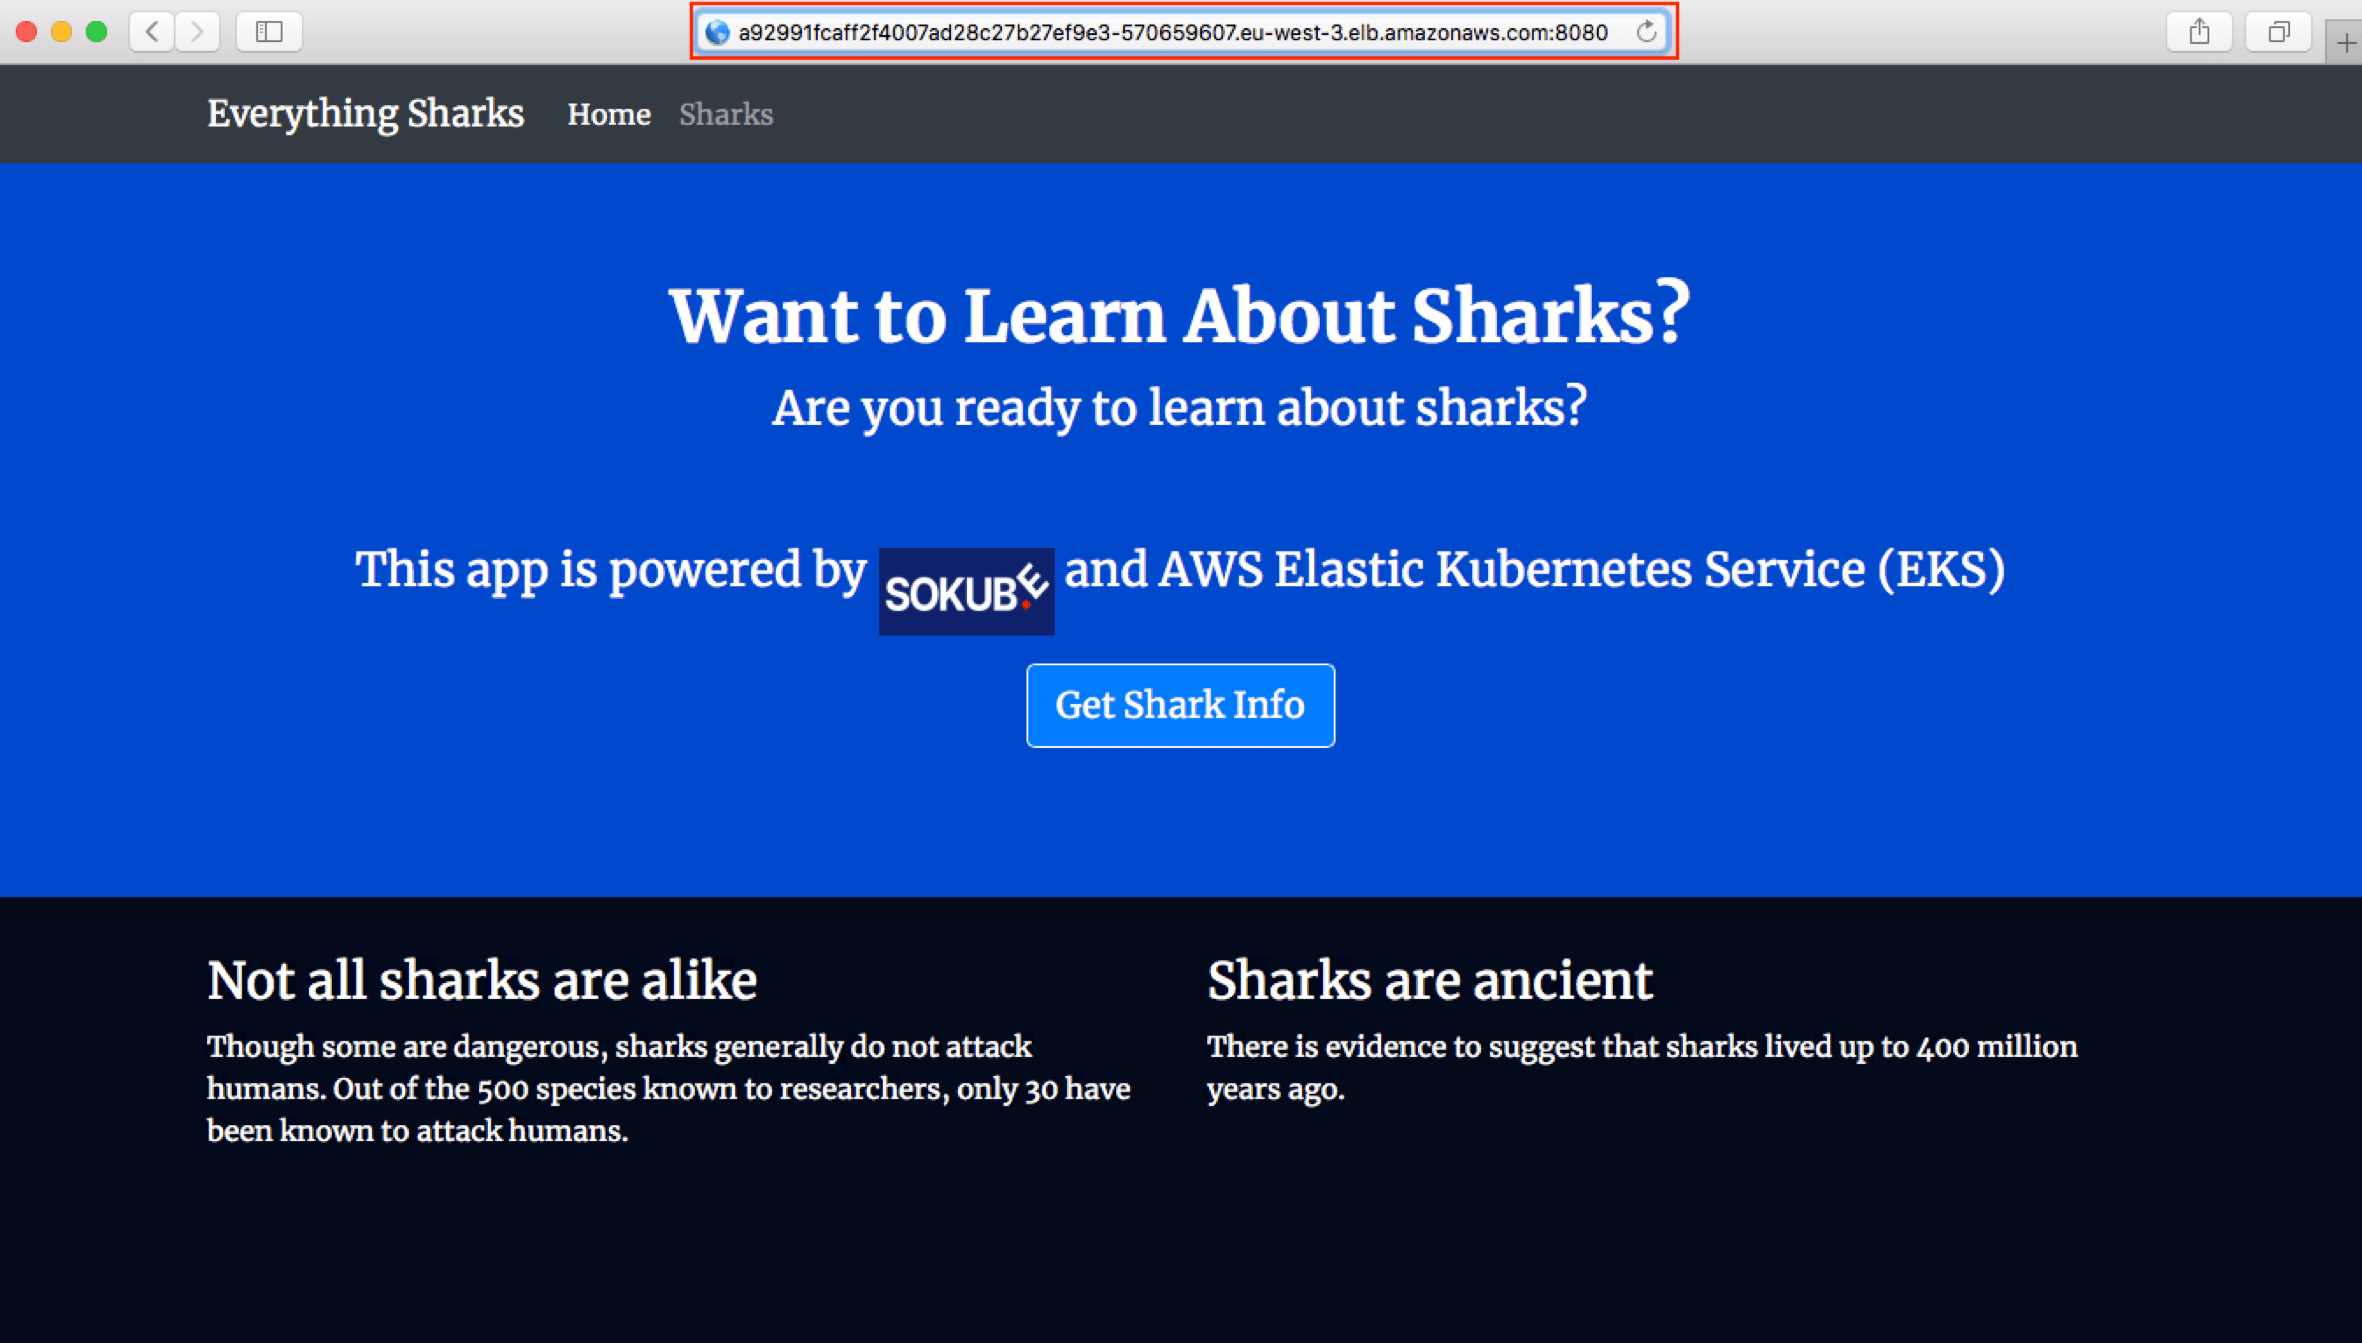
The shark-app is well reachable with the DNS name of the ELB. The EKS Cluster is working.
If you regularly use AWS, you know the famous :
"Pay only what you use"
However this includes as well to pay for what you forget to turn off or to delete… 😁
Keep in mind that resources, even idle, are provisioned and billed. To avoid expensive bills, make sure to regularly cleanup your test / demo clusters.
For reference, such as cluster’s cost is nearly $5 / day.
You can find on SoKube GitHub repository all commands to delete all created resources.
AWS provides a fully managed Kubernetes Cluster. If you want to focus mainly on the application side, designing and installing a production-ready Kubernetes Cluster might feel quite a complex and time consuming task. With AWS EKS, Amazon provides a Kubernetes cluster on a proven infrastructure, scalable and highly available.
In this article, we saw how to create a highly available, fault-tolerant EKS Cluster with two worker nodes and network isolation. Now you can go a step further and find what’s under the hood with the power of Kubernetes and AWS. For example, you can test how to implement RBAC using AWS IAM, or an AWS CI/CD pipeline with the EKS integration and many more things…
You can also find an alternative tutorial to deploy the same infrastructure using only AWS CLI. It’s an interesting alternative to understand how to implement network and EKS Cluster (Control Plane + Worker Nodes) in Amazon cloud. You can view this tutorial on the SoKube GitHub.