
By Lionel Gurret.
Ansible is a well known open source automation engine which can automate, provision, handle configuration management and orchestration. As it doesn’t need an agent by using SSH protocol, and because you don’t need to write code using simple modules, Ansible eases the deployment and management of your applications !
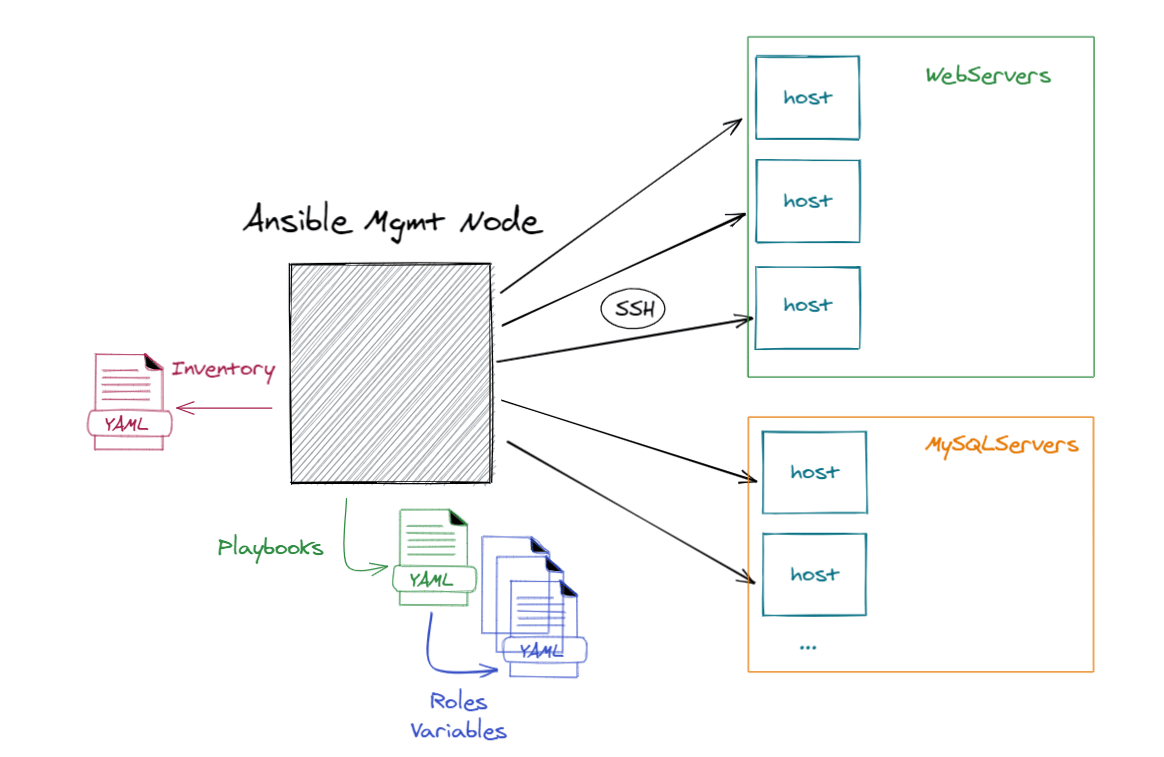
Before discussing how we can optimize your Ansible configuration, here is a quick reminder on how it works. You can see on the following picture an "Ansible Management node". This host perform operations on target infrastructure by pushing configurations through playbooks and roles. Each host called in the playbook will be configured as you expect them to be. Finally, hosts can be organized in groups through an inventory file which helps us decide which hosts we are controlling, when and for what purpose :
We can use Ansible for so many tasks as provision virtual machines, apply configurations or even patch them.
However, in some contexts like continuous delivery, having fast Ansible scripts (called playbooks) is required to get rapid feedback as well as reducing the possible Ansible load on the target servers.
In this article, we are going to see important concepts which can provide Ansible with a great performance, and finally go through some benchmarking to quantify the possible improvements.
One important Ansible module is the yum module. You can use it to install, upgrade, downgrade, remove, or list packages and groups with the yum package manager (or apt for debian). A common issue is to invoke several times the same module in multiple tasks like so :
- name: install the latest version of nginx
  yum:
    name: nginx
    state: latest

- name: install the latest version of postgresql
  yum:
    name: postgresql
    state: latest

- name: install the latest version of postgresql-server
  yum:
    name: postgresql-server
    state: latest
Yums are expensive ! Ansible is smart and knows how to group yum or apt transactions to install multiple packages into a single transaction, so it’s a huge optimization to install all the required packages in a single task :
- name: Install a list of packages
  yum:
    name:
      - nginx
      - postgresql
      - postgresql-server
state: presentTo run a shell command on an Ansible host, you can use modules like shell or command. Both are really time consumers as we will see in the benchmark. Always check if there isn’t a more appropriate module :
- name: Create a directory (BAD WAY using a shell command)
  shell: mkdir /tmp/sokube

- name: Create a directory (GOOD WAY using a module)
  file:
    path: /tmp/sokube
    state: directory
It won’t be just faster but it will also leverage the idempotent property of the modules. It means that after 1 run of a playbook to set things to a desired state, further runs of the same playbook should result in 0 change. In simpler terms, idempotency means that Ansible playbooks can be executed several times without any side effects so that consistency of the environment is maintened.
We will see in our benchmark how efficient it is when you use modules, instead of shell commands.
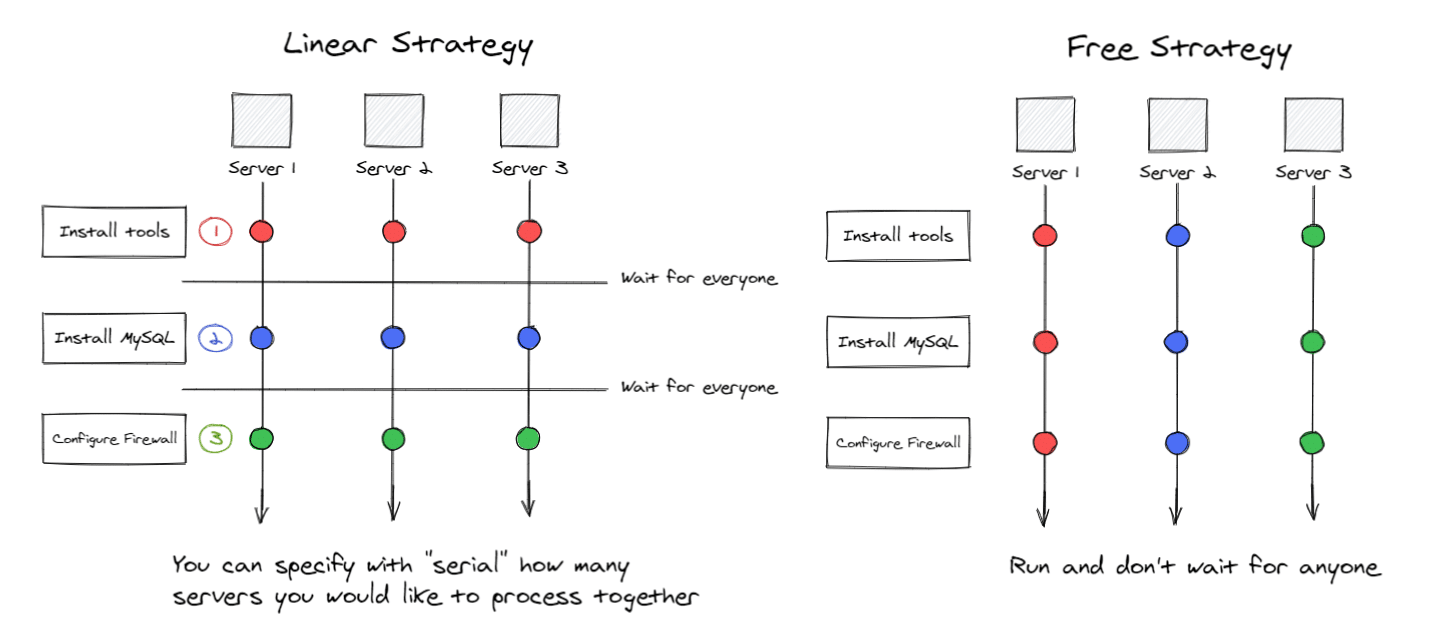
When running a playbook, Ansible uses a strategy that is basically the playbook’s workflow. It’s important to select the correct strategy if we want to improve efficiency. The default one is linear: it will run each task on a number of hosts and wait for each task to complete before starting the next one.
If the target is independent, we can consider the "free" strategy. Tasks will be processed independently on the status of tasks on other hosts, as explained in the following picture :
We can define custom strategies by developing plugins or use existing plugins like mitogen, which we will discuss later on this page.
Forks define the maximum number of simultaneous connections Ansible made on each task. It will help you manage how many hosts should get affected simultaneously. By default, the parameter is 5, which means that only 5 hosts will be configured at the same time. We can improve that value as far as it doesn’t interfere with your infrastructure’s resources.
Forks can be configured in the the ansible.cfg file:
forks=25By default Ansible runs tasks synchronously, holding the connection to the remote node open until the action is completed. When the task is truly independent, that is no other task is expecting to be finished to get started, defining the task as asynchronous can truly optimize the overall execution, as show in the below example:
---

- name: My Playbook to test Async and Poll
  hosts: webservers
  tasks:
    - name: Copy the script from Ansible host to node for testing
      copy:
        src: "my-longrunning-script.sh"
        dest: "/tmp"

    - name: Execute the long running script
      shell:
        "chmod a+x /tmp/longrunningscript.sh &&  /tmp/my-longrunning-script.sh 60" # Run for 60 seconds
      async: 120 # Maximum allowed time in Seconds
      poll: 05 # Polling Interval in Seconds

    - name: Some non dependent task I want to run even if the script is still running
      yum:
        name: httpd
        state: present
In this example, we will be able to install httpd package, even if the script is still running. Ansible will in the meantime poll every 5 seconds and allows the script to finish within 120 seconds without displaying errors.
If you want to run only a small part of your playbook, you should consider using tags.
It is really easy to use and efficient. You only need to break your playbooks in small parts and add "tags" in your blocks.
Here is a simple example of tags usage in a playbook:
- name: First part of my playbook using command module
  hosts: all
  tasks:
    - name: "With command"
      command: touch /tmp/lionel
      with_sequence: start=1 end="{{end|default(100)}}"
  tags: with-command # Here is my first tag

- name: Second part of my playbook using file module
  hosts: all
  tasks:
    - name: "With module"
      file:
        path: /tmp/lionel
        state: touch
      with_sequence: start=1 end="{{end|default(100)}}"
  tags: with-module # Here is my second tag
If you want to run only the first part of your playbook, you can run the following commands :
ansible-playbook -i inventory myplaybook.yml --tags with-command # or ansible-playbook -i inventory myplaybook.yml --skip-tags with-moduleBy default, when Ansible connects to a host, it collects information such as system information (processors, OS, CPUs), network connectivity, devices information etc.
This is known as "facts". This operation can be time-consuming, and should be avoided if not necessary, or optimized with a facts cache when necessary.
I would suggest to let gathering enabled by default in your ansible.cfg file and disable it when you don’t need them directly in your playbooks :
- hosts: all
  gather_facts: no
  tasks:
    - ping:
Facts gathering can be improved using fact caching. It can use redis or create JSON files on your Ansible host. Following options in the ansible.cfg file will use smart gathering and facts caching with a local json file :
gathering = smart
fact_caching = jsonfile
fact_caching_connection = /tmp
The "Smart" option means each new host that has no facts discovered will be scanned, but if the same host is addressed in multiple plays it will not be contacted again in the playbook run. We will keep cache in JSON format in the "tmp" directory.
There are several SSH settings that can be tuned for a better performance. First, we should configure ControlPersist so connections to servers can be recycled and set PreferredAuthentications to "publickey" to not run into delays in servers that have GSSAPIAuthentication enabled.
The most important setting for SSH is, in my opinion, "pipelining", as it will reduce the number of SSH connections required to run some modules.
Here is an example of ansible.cfg with such SSH optimizations :
[ssh_connection]
pipelining=True
ssh_args = -o ControlMaster=auto -o ControlPersist=3600s -o PreferredAuthentications=publickey
Mitogen plugin developers claim that you can increase by 7 the speed of Ansible and drop by half CPU usage.
Ansible uses shell-centric implementation whereas Mitogen uses pure-Python equivalents, invoked via highly efficient remote procedure calls to persistent interpreters tunneled over SSH.
It means :
No changes are required to target hosts and it’s really easy to deploy and install :
And that’s it !
We will see how efficient it is in our benchmark. The extension is considered stable and real-world use is encouraged. However, Mitogen isn’t officially supported by Ansible. So you have to be very careful using it ! Validate your workflows in labs before production !
I wanted to use a light Ansible environment. To do so, I have decided to use Docker containers on my laptop. You can find all my scripts and images in the following repository. There is one Ansible controller (version 2.9 to be able to use Mitogen plugin) and as many Centos 7 hosts you want (8 in my use case.) This lab can be used directly on a Docker Environment. Just run the command given in the README.md file. You will be directly logged into your ansible controller container after running run.sh.
You can run the following command to check that everything works as expected :
ansible -m ping all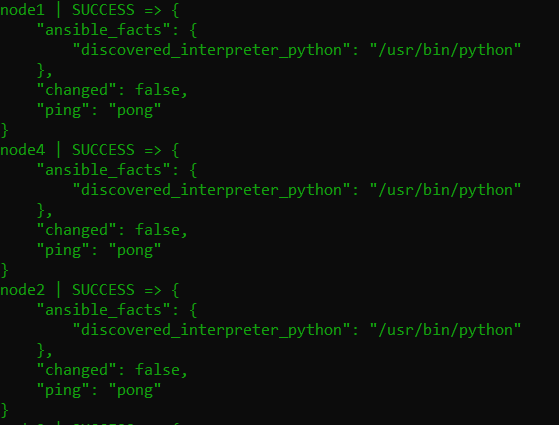
If everything is ok, you can use my script run-benchmark.sh or play on your own !
I have used the benchmark.yml playbook for benchmarking optimizations.
In this playbook there are basically two parts.
In the first part, I wanted to check how much time I can save using modules instead of commands.
In the second part, I wanted to install several roles and have enough time elapsed to compare.
One important thing before benchmarking is to enable logging to be able to see what takes time in our playbooks. You only need to add the following line in your ansible.cfg :
callback_whitelist = profile_taskYou will indeed have more information displayed after each playbook execution (first play, without any optimizations) :
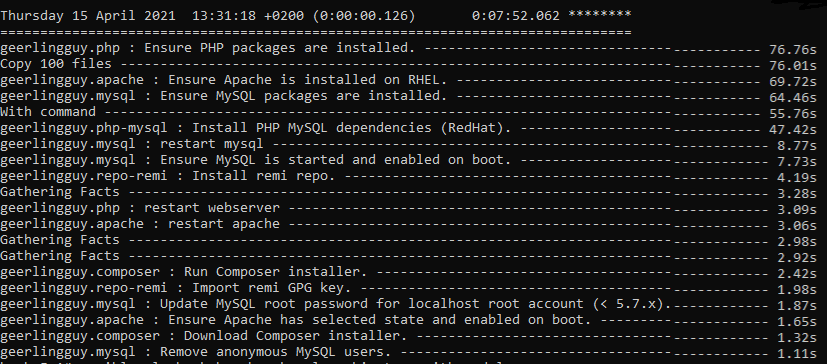
I wanted to see what optimizations affect the most my playbook so I have done two things.
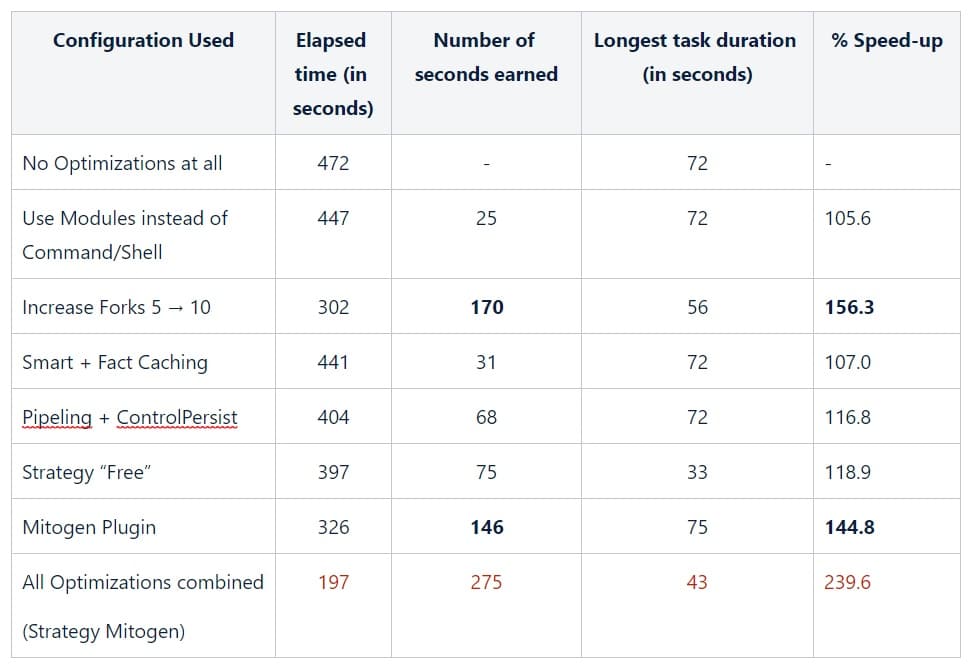

As we can see checking the results, Mitogen plugin, forks and SSH pipelining were, in my case, the best optimizations tested. Without changes my playbook took almost 8 minutes to complete. After that only 3 minutes !
Obviously, it also depends of your playbooks and environment but all those optimizations can really improve the speed of Ansible and keeping it the great tool it is, even when speed is critical !